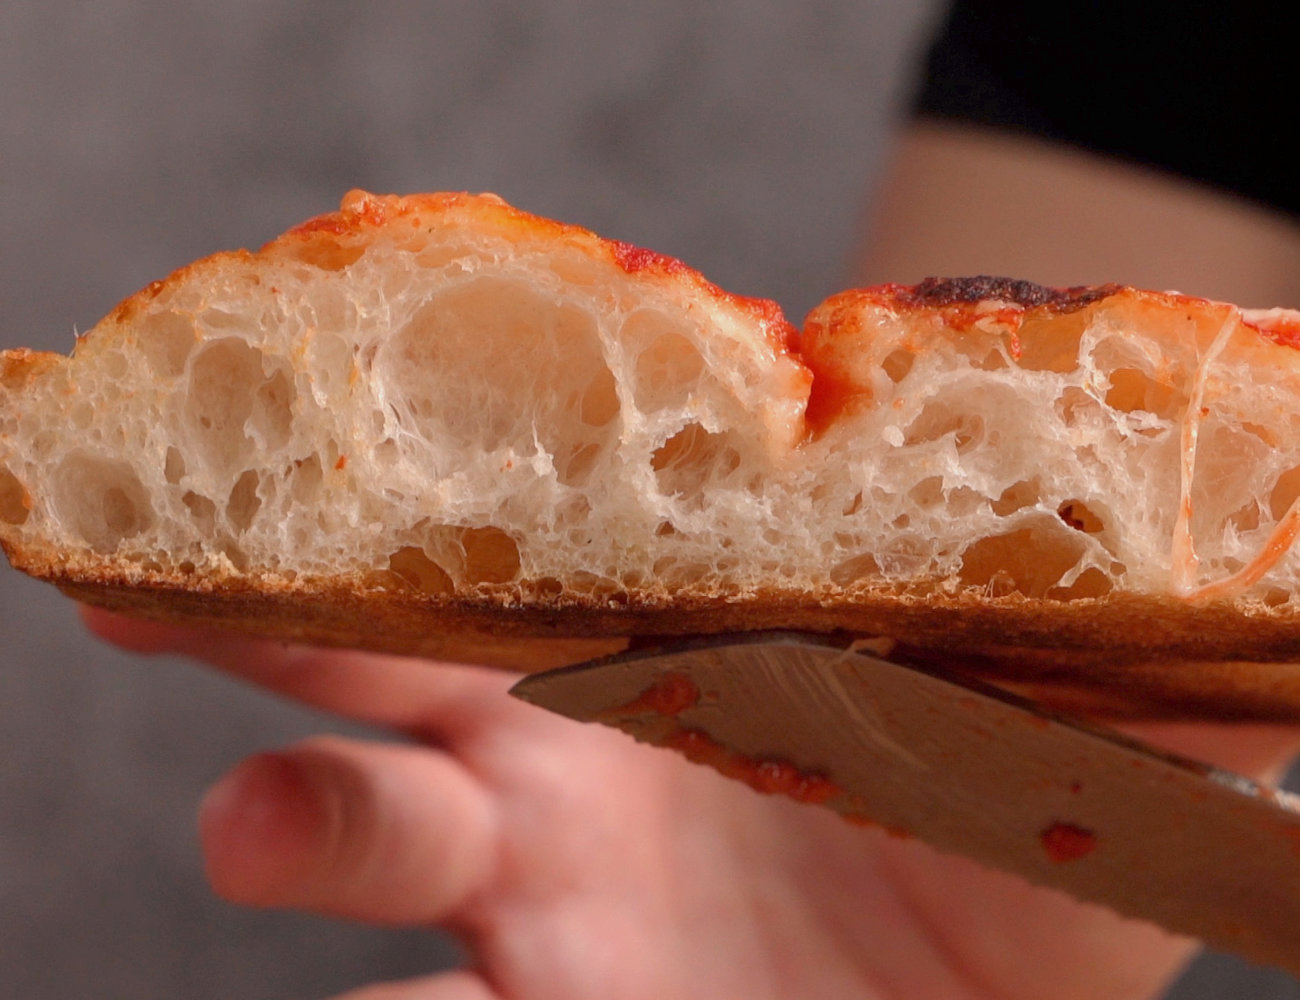
How to Make 70% Hydration Pizza Dough
Learn how to make a 70% hydration pizza dough that is delicious and HIGHLY DIGESTIBLE! It will be soft inside, with a crispy crust!
Equipment
- 2 baking pans 16 x 12 in or 40 x 30 cm
- 1 large proofing container use the same shape as your final pizza tray (rectangular for rectangular pizza trays, round for round).
- 2 smaller proofing containers use the same shape as your final pizza tray (rectangular for rectangular pizza trays, round for round).
- 1 work surface
Ingredients
- 5 ½ cups flour '0' (W 260-280) 25 oz - better to weigh the flour!
- 2 cups water filtered for best taste
- 2 g dry yeast or 4 g of fresh yeast
- 1 tbsp fine salt
- semolina flour for dusting work surface (optional)
Instructions
Make the Dough
- In a large bowl, dissolve the yeast in the water.2 cups water, 2 g dry yeast
- Add the flour to the water, a little at a time and mix.5 ½ cups flour '0' (W 260-280)
- Add the salt to the dough and mix thoroughly. Use your hands if needed, as the dough will be getting stiff.1 tbsp fine salt
Knead the Dough
- Transfer the dough to a clean work surface. Knead the dough for 10 minutes.
First Dough Rest
- Cover the dough with a bowl or damp towel. Let it rest for 20 minutes.
Stretch Dough to Dry
- Stretch the dough out a bit to dry it (optional). Here, we can see the lovely gluten mesh that has formed!
Fold the Dough
- Close the dough by folding it and make a round of book folds. Fold until you can no longer fold the dough without the dough tearing.
Second Dough Rest
- Cover the dough with a bowl or damp towel. Let it rest 30 minutes.
Fold the Dough More
- Close the dough by folding it and make a round of book folds. Fold until you can no longer fold the dough without the dough tearing.
Third Dough Rest
- Cover the dough with a bowl or damp towel. Let it rest 30 minutes.
Final Folds
- Make a final round of folds. Fold the dough like a letter, then a book. Pinch the dough to seal it and place it pinch side down on the work surface.
First Dough Rise
- Place the dough into a container that is the same shape of your final pizza pan. Ideally, you want to use a plastic container with a lid. Cover the dough (or put the lid on) and let the dough rise until it has doubled in size— about 3 hours.
Divide the Dough and Fold
- After the rise, let the dough gently fall out of the container and onto the work surface. Split the dough into two parts.
- Fold each piece of dough like a letter... then a book. Fold until the dough is a compact ball and full of air.
Second Dough Rise
- Place each dough ball into a smaller container and cover. Let the dough rise until they are doubled in size again—another 2 hours!
Stretch the Dough
- Dump each piece of dough (one at a time) onto a lightly floured work surface. Ideally, use semolina flour for dusting the work surface. Press down the outer edges with your fingertips. Then, use your fingertips to press the dough down and out, starting from one end and finishing at the other.
- Flip the stretch dough. Then pull the dough to gently stretch it width-wise. Shake off any loose flour.
- Transfer the stretched dough to the baking sheet. Use your fingertips to press and stretch the dough to the end of the baking sheet borders (if needed). Repeat with the other dough ball.
Third Dough Rise
- Cover both pizzas and let them rest for 30-45 minutes.
Bake the Pizza
- Pre-heat the oven to 575°F (300°C). Add the toppings to each pizza (minus any cheese). Bake the pizzas one at a time for 9 minutes in a static oven. Cover with cheese and return to the oven to melt the cheese (another 3 minutes or so). Buon appetito!
Video
Notes
Proofing Containers and Baking Trays: Use same shape!
You'll find the pizza much easier to stretch to the shape of your baking tray if you proof the pizza dough in containers that are the same basic shape as the final tray.
So, that means you should use rectangular containers for rectangular sheet pan pizzas. Use round bowls to proof pizzas that will be baked in round baking trays.
Tried this recipe?Let us know how it was!