On this website, you’ll always find the most traditional Italian food recipes, including authentic Italian pizza recipes! In this PIATTO™ guide, you’ll learn how to make 70% hydration pizza dough! This type of pizza dough is perfect for a classic Italian pan pizza, sold in pizzerias in Italy and made in Italian home kitchens.
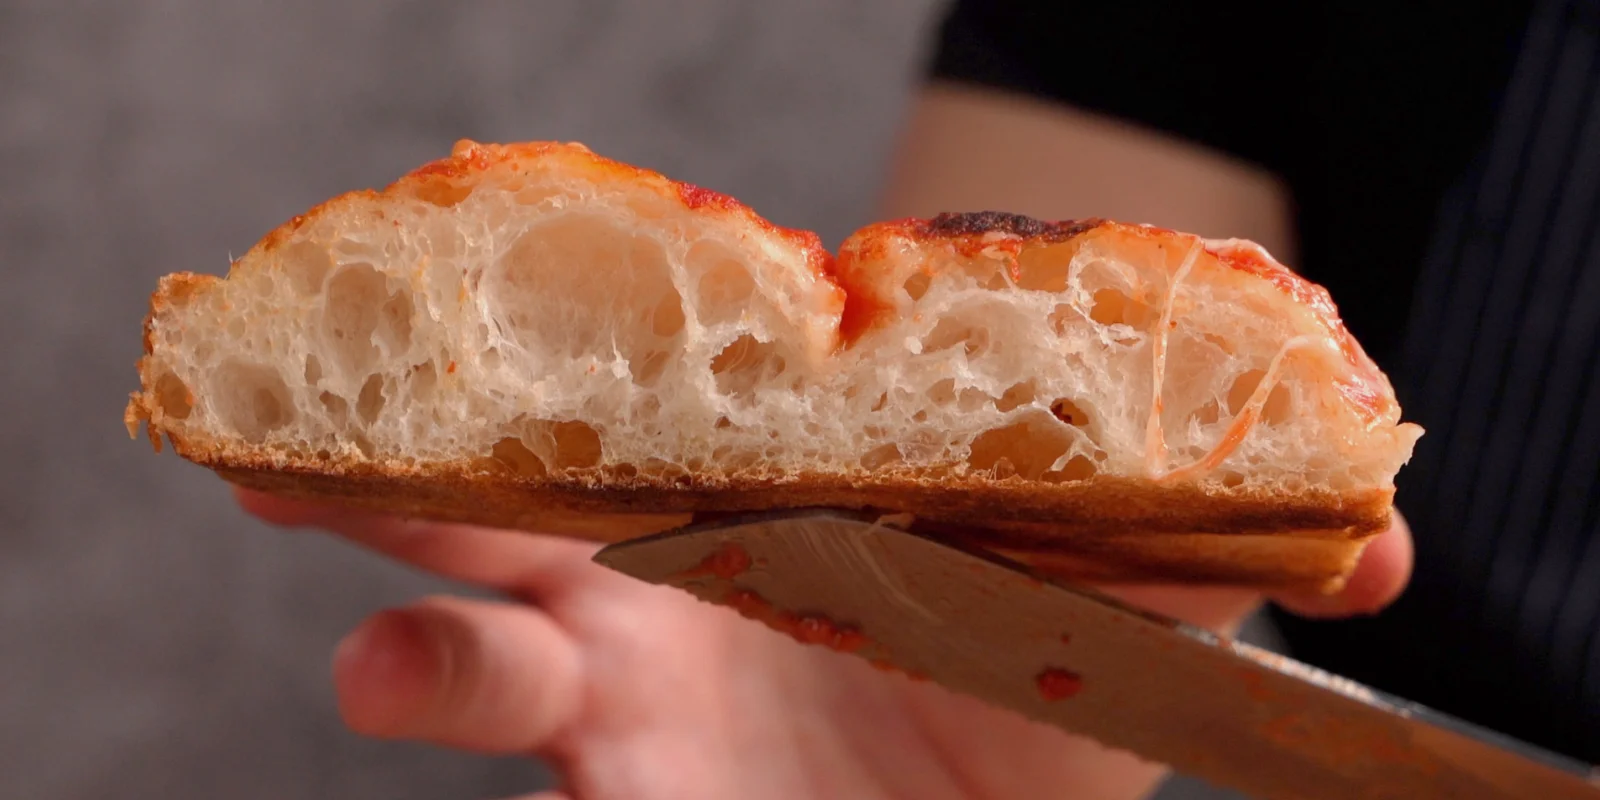
This 70% hydration pizza dough creates a final pizza that is SOFT inside with a crispy crust! Best of all, it creates a homemade pan pizza that is super digestible— which isn’t the case for all pizza dough recipes.
- soft inside
- crispy crust
- super digestible
Watch the Video Recipe
Watch us make a sheet pan pizza with our 70% hydration pizza dough in this video recipe, filmed in Italy:

Watch more PIATTO Pizza Making Videos!
Subscribe to our YouTube Channel
More video recipes? Subscribe to our YouTube Channel (it’s FREE) and click the bell to get notifications when we release a new video recipe!
What Flour to Use
Choose a ‘strong’ flour to make this pizza dough. The flour package should say that the ‘W’ is 260-280. You can also just select a flour that says it is made for pizzas, however sometimes these so-called pizza flours can be hard to digest.
To learn more about what the ‘W’ means on the flour package, keep reading till the end of this article!
We use ‘Caputo Nuvola’!
We Caputo Nuvola for this pizza dough recipe! It is a…
- Flour ‘0 ‘
- with a W 260-280
Used in pizzerias throughout Italy, this flour is thankfully available on Amazon! It’s perfect for a tall, soft digestible pizza, and it is the product shown in our video recipe!
- You can find Caputo Nuvola on Amazon (affiliate link): https://amzn.to/46sm8Zt

Best Pasta Cookbook? Ours!
Seductive strands of pasta and sumptuous sauces… Are you ready to indulge in an unforgettable Pasta Affair? This cookbook is a must-have for any serious lover of Italian food, featuring over 50 classic pasta recipes you can make at home!
AVAILABLE AS A PRINT HARDCOVER OR EBOOK
70% Hydration Pizza Dough Recipe
We went through a lot of pizza dough recipes before we perfected this one! We call it our Crunch and Poof pizza because it is soft like a cloud inside with a crunchy crust. Yes, you could use ‘manitoba’ flour (a different grain often used for pizza), but this flour tends to be very hard to digest! For this reason, we think our recipe is ideal with the flour we’ve recommended.
This recipe is for 2 PAN PIZZAS. Here are the details:
- makes 2 pizzas
- pan sizes: 16 x 12 in or 40 x 30 cm
- 6 hour proof
- 72°F / 22ºC proofing temperature
Here is the recipe (or, check the recipe card below):
- flour 0 (W 260-280): 5 1/2 cups (700 g) – better to weigh the flour!
- water: 2 cups (500 g)
- yeast: 2 g dry (about 1 tsp) or 4 g fresco
- fine salt: 1 tbsp (18 g)
Tips for Making the Pizza Dough
If you are serious about making a fantastic homemade pizza dough (or baking in general), it’s always best to weigh the ingredients! Weights are much, much more accurate than volume.
How to Mix 70% Hydration Dough
You can use either a large mixing bowl or a stand mixer to mix the pizza dough. If using a stand mixer, use the paddle attachment.
Add the salt after you’ve added the flour. Salt can inhibit yeast if the two come in direct contact.
How to Knead 70% Hydration Dough

Similarly, you can use your hands or a stand mixer (with a dough hook) to mix the pizza dough.
Kneading does help to build up the gluten in the dough and give your pizza structure as it rises. However, kneading is not the only process we use to give this pizza dough a great structure!
Our recipe (see the recipe card below) calls for a series of book and letter folds that help this pizza dough trap air as it proofs. These folding/resting steps are critical to creating the best possible structure for your homemade pizza!
We find that a large, stainless steel work surface works really well for working with high-hydration dough and pastry dough.
How to Stretch 70% Hydration Dough
Stretching this pizza dough is really easy if you proof the dough in the same shape of container as that of your final pizza trays!
rectangular proofing box = rectangular pizza tray
round proofing container = round pizza tray
When it’s time to stretch the pizza, lightly flour your work surface with semolina flour (or cornmeal). Then, turn over the proofing container and let the pizza dough fall out gently, keeping its proofing shape as much as possible.
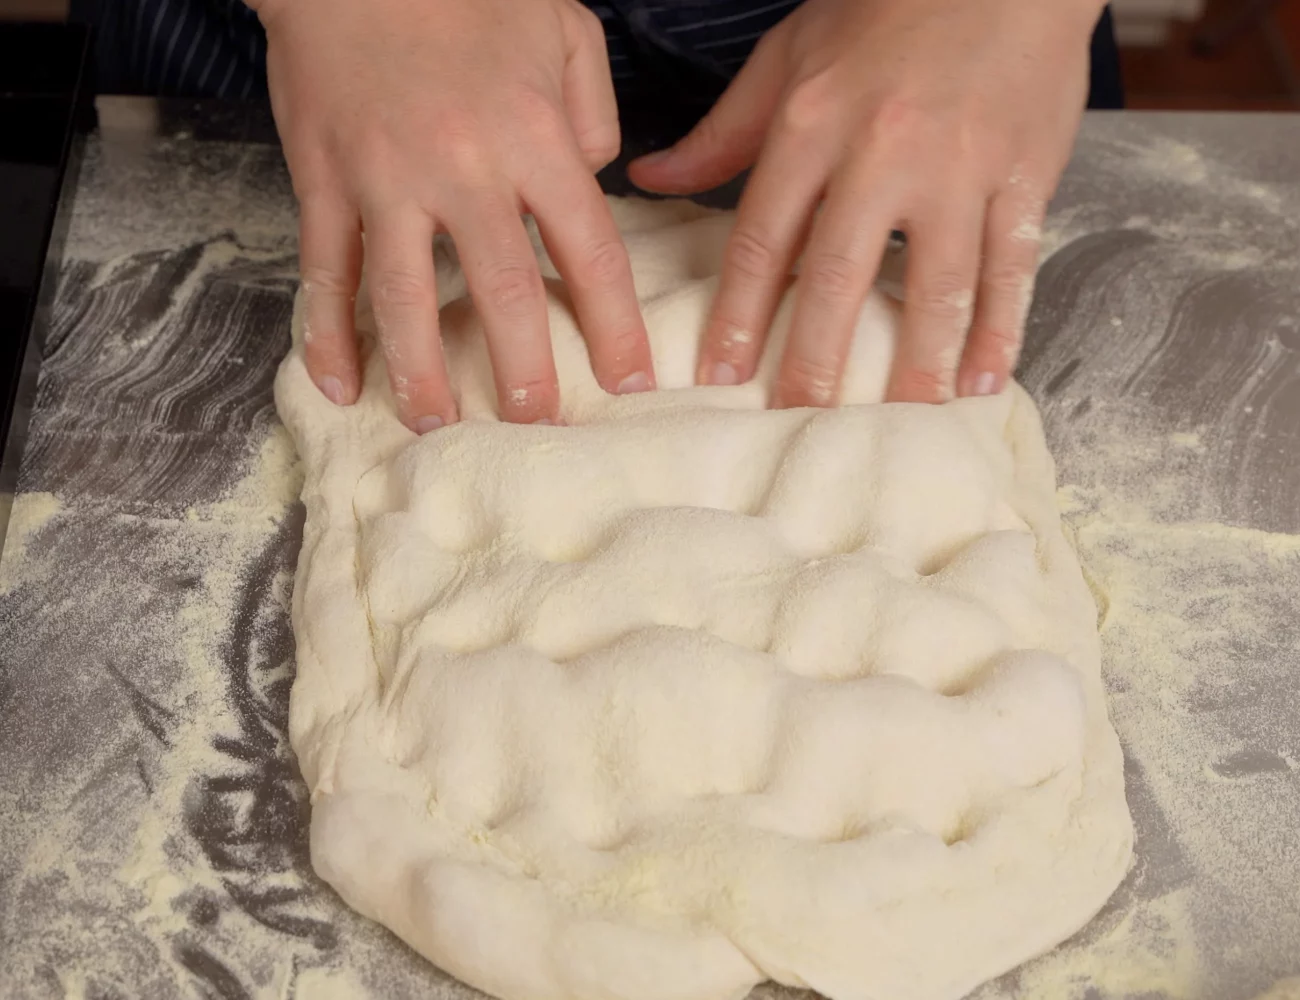
Italian pan pizzas have short sides, so first use your finger tips to push down the border of the pizza dough. Then, to stretch the pizza, use your fingers tips to push the pizza down and out. Start at one side and proceed across to the other. It’s like stretching focaccia dough! See the picture below to see this process in action!

What surface do we use to stretch the dough?
Personally, we love our stainless steel work surface for stretching pizza dough (affiliate link) You can find one almost identical to the one we use in Italy (featured in the photos and our video) on Amazon. It’s sometimes called a ‘pastry board’ and indeed it works great for making pasta and pastry dough as well. Why we love it:
- offers the perfect resistance for working with high hydration dough
- more hygienic than most countertops
- large surface that covers tables or countertops, keeping them clean and offering a perfect work surface
- easy to clean
- You can find a stainless steel work surface like the one shown in the photos on Amazon (affiliate link): https://amzn.to/48uPDf3
One note: Most of these products have sharp edges. You may want to use an oven mitt or similar to carry it.
How to Choose Flour for Pizza Dough
Gluten Matters
Gluten is a hydrophobic protein (it does not dissolve in water) which derives from the union of the two most abundant proteins in flour: glutenin and gliadin.
Flour Strength – ‘W’
Flour ‘strength’ is expressed with the letter “W” on the flour package.
This gives us a clear idea of how our dough will behave during and after rising. The strength is measured by the manufacturers through a laboratory device called Chopin’s alveograph and is directly proportional to the amount of gluten in the dough.
By definition, flours with…
- W between 180-260 are medium strength flours
- W below 180? The flour is weak.
- Above 260? The flour is strong.
Choosing Flour for Pizza Dough
In general, you want to choose your flour based on the amount of hydration of the dough and the rising time. The higher the water content and / or the time you will let the dough rise, the higher the W of the flour must be.
However, with this pizza dough recipe, you don’t need to work out these details 🙂
Tips for Baking High Hydration Pizza
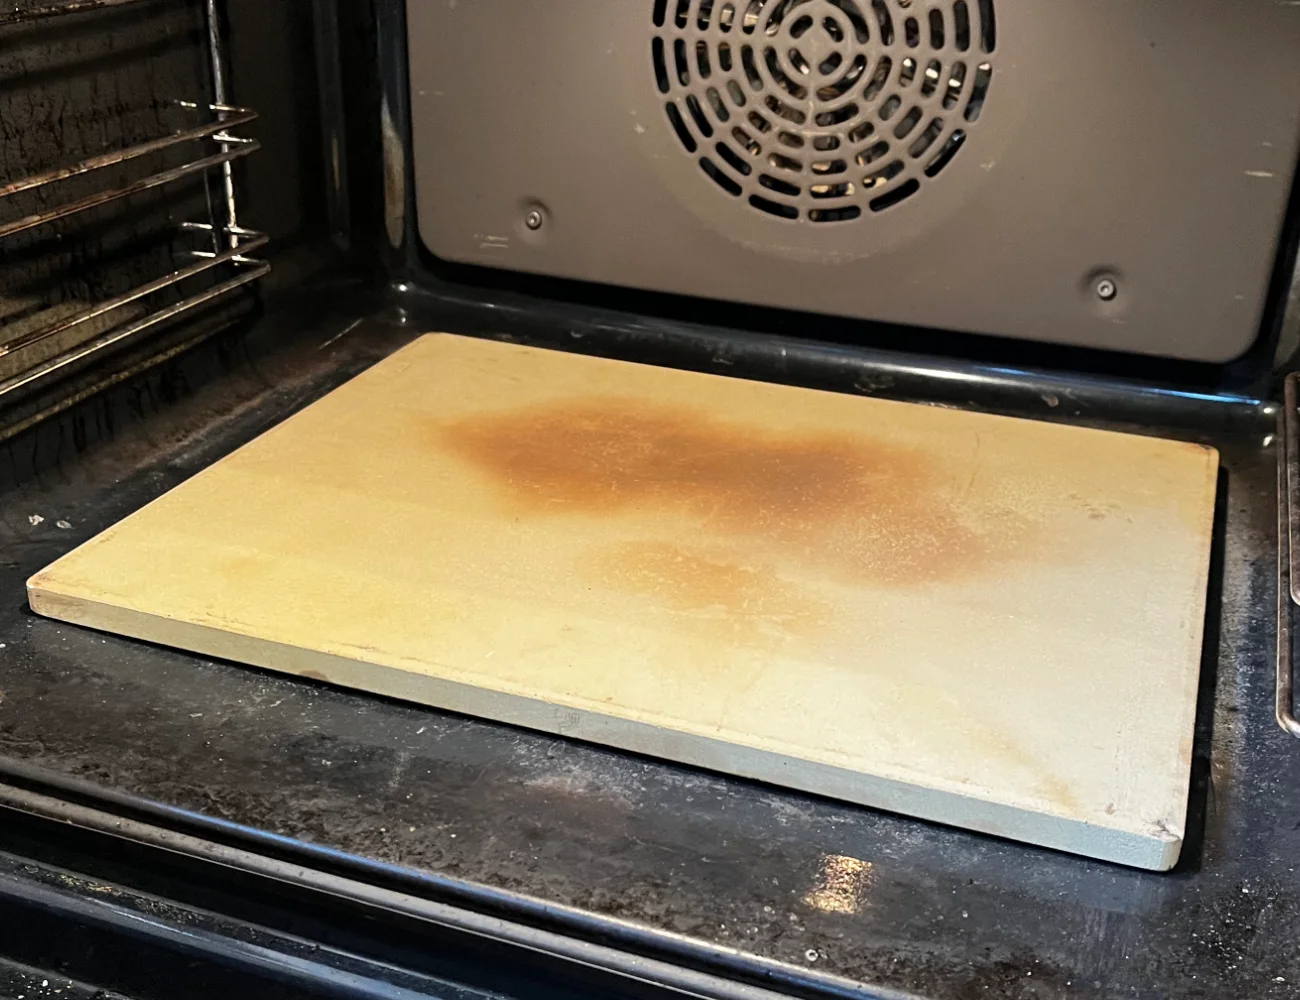
We always use a baking stone (affiliate link) for baking our high hydration pizzas—for baking all pizzas in fact! We also bake our breads—such as this high hydration focaccia recipe—on a baking stone. Pizzas in Italy are typically baked in wood fired ovens that can reach much higher temperatures than a conventional oven.
To bake at the highest temperature in a conventional oven, we place our baking stone directly on the floor of our oven. We then place our high hydration pizza (or whatever pizza we are baking) in the pan directly on the pizza stone (see below). This enables us to create a fast and even bake.
- Find a baking stone similar to the one we use on Amazon: https://amzn.to/431mDIm (affiliate link)
Proofing Containers and Baking Trays: Use same shape!
You’ll find the pizza much easier to stretch to the shape of your baking tray if you proof the pizza dough in containers that are the same basic shape as the final tray.
So, that means you should use rectangular containers for rectangular sheet pan pizzas. Use round bowls to proof pizzas that will be baked in round baking trays.
Won’t this warp the baking tray? Only if you are using a cheap baking tray 🙂 Unfortunately, there are no products on Amazon that we found suitable for the job. Our baking trays are ‘blue iron’ (ferro blu). We purchased our trays from this Italian company. The company is not sponsoring us in any way. We are just sharing this information to assist you.
Why do we like these trays? These blue iron trays provide an incredibly even bake, are solid at high temperatures and have straight edges with cross in the center to prevent warping.
As an Amazon Associate, we earn from qualifying purchases. This means at no extra cost to you, PIATTO may earn a small commission if you click the links and make a qualifying purchase.
How to Make 70% Hydration Pizza Dough
Equipment
- 2 baking pans 16 x 12 in or 40 x 30 cm
- 1 large proofing container use the same shape as your final pizza tray (rectangular for rectangular pizza trays, round for round).
- 2 smaller proofing containers use the same shape as your final pizza tray (rectangular for rectangular pizza trays, round for round).
- 1 work surface
Ingredients
- 5 ½ cups flour '0' (W 260-280) 25 oz – better to weigh the flour!
- 2 cups water filtered for best taste
- 2 g dry yeast or 4 g of fresh yeast
- 1 tbsp fine salt
- semolina flour for dusting work surface (optional)
Instructions
Make the Dough
- In a large bowl, dissolve the yeast in the water.2 cups water, 2 g dry yeast
- Add the flour to the water, a little at a time and mix.5 ½ cups flour '0' (W 260-280)
- Add the salt to the dough and mix thoroughly. Use your hands if needed, as the dough will be getting stiff.1 tbsp fine salt
Knead the Dough
- Transfer the dough to a clean work surface. Knead the dough for 10 minutes.
First Dough Rest
- Cover the dough with a bowl or damp towel. Let it rest for 20 minutes.
Stretch Dough to Dry
- Stretch the dough out a bit to dry it (optional). Here, we can see the lovely gluten mesh that has formed!
Fold the Dough
- Close the dough by folding it and make a round of book folds. Fold until you can no longer fold the dough without the dough tearing.
Second Dough Rest
- Cover the dough with a bowl or damp towel. Let it rest 30 minutes.
Fold the Dough More
- Close the dough by folding it and make a round of book folds. Fold until you can no longer fold the dough without the dough tearing.
Third Dough Rest
- Cover the dough with a bowl or damp towel. Let it rest 30 minutes.
Final Folds
- Make a final round of folds. Fold the dough like a letter, then a book. Pinch the dough to seal it and place it pinch side down on the work surface.
First Dough Rise
- Place the dough into a container that is the same shape of your final pizza pan. Ideally, you want to use a plastic container with a lid. Cover the dough (or put the lid on) and let the dough rise until it has doubled in size— about 3 hours.
Divide the Dough and Fold
- After the rise, let the dough gently fall out of the container and onto the work surface. Split the dough into two parts.
- Fold each piece of dough like a letter… then a book. Fold until the dough is a compact ball and full of air.
Second Dough Rise
- Place each dough ball into a smaller container and cover. Let the dough rise until they are doubled in size again—another 2 hours!
Stretch the Dough
- Dump each piece of dough (one at a time) onto a lightly floured work surface. Ideally, use semolina flour for dusting the work surface. Press down the outer edges with your fingertips. Then, use your fingertips to press the dough down and out, starting from one end and finishing at the other.
- Flip the stretch dough. Then pull the dough to gently stretch it width-wise. Shake off any loose flour.
- Transfer the stretched dough to the baking sheet. Use your fingertips to press and stretch the dough to the end of the baking sheet borders (if needed). Repeat with the other dough ball.
Third Dough Rise
- Cover both pizzas and let them rest for 30-45 minutes.
Bake the Pizza
- Pre-heat the oven to 575°F (300°C). Add the toppings to each pizza (minus any cheese). Bake the pizzas one at a time for 9 minutes in a static oven. Cover with cheese and return to the oven to melt the cheese (another 3 minutes or so). Buon appetito!
Video
As an Amazon Associate, we earn from qualifying purchases. This means at no extra cost to you, PIATTO may earn a small commission if you click the links and make a qualifying purchase.
🇬🇧 This is the English-language version of our original Italian recipe on PIATTO Ricette.
“Fatta ed ho ottenuto un buon risultato …. Grazie”
“Grande bravissimo!!!😀Mi viene voglia di farla…..la farò sicuramente 🥰”
“Ti ringrazio molto 🦋 l’ho fatta e non ho parole per descrivere la sua bontà 🤤”
“Buonissima, l’ho fatta x questa sera ed è ottima👍👍👍😋😋, bell ‘impasto , piena di alveoli, morbida e croccante allo stesso tempo, grazie x la spiegazione e video senza tagli x nascondere i segreti come fanno certi…🙋”
“Complimenti e grazie per il video come fai la crema di patate”
“Finalmente la ricetta definitiva, croccante sul fondo e alveolata sopra, variato i gusti suggeriti mozzarella, verdure miste, funghi e salsiccia e infine patate tagliate sottili su fondo di fiordilatte e rosmarino. La spiegazione mi ha consentito di avvicinarmi al risultato del video, spero in futuro di migliorare. Grazie”
“Bravissimo… una domanda… la teglia va unta di olio? Grazie”
“💯💯💯💯💯💯💯💯😋👍”
“Bravo bravo e bravo 💯👏👏👏”
Or, watch this video recipe on our YouTube Channel: https://youtu.be/EnmpN8H-_HY
This recipe works so well.
Where is the recipe for the creamy potato and onion topping got the pizza shown?
We’ve not yet added it to the site. I’ll pass along that there are requests for that pizza topping recipe. 🙂 Thanks for taking the time to leave a comment!
I tried the recipe, even weighed the flour. I used Canadian, all-purpose flour. However, my dough isn’t as light or full of bubbles like yours. Yours looks wetter. Please tell me what could have gone wrong. I followed the recipe to a tee. Thanks
Hi Mary– Some all-purpose flour has enough gluten to deliver on this recipe. However, if yours isn’t delivering, try a ‘bread’ flour or even the specific Italian flour we’ve linked to (available on Amazon). Even in Italy, the brand of flour we use changes the structure of the dough significantly.