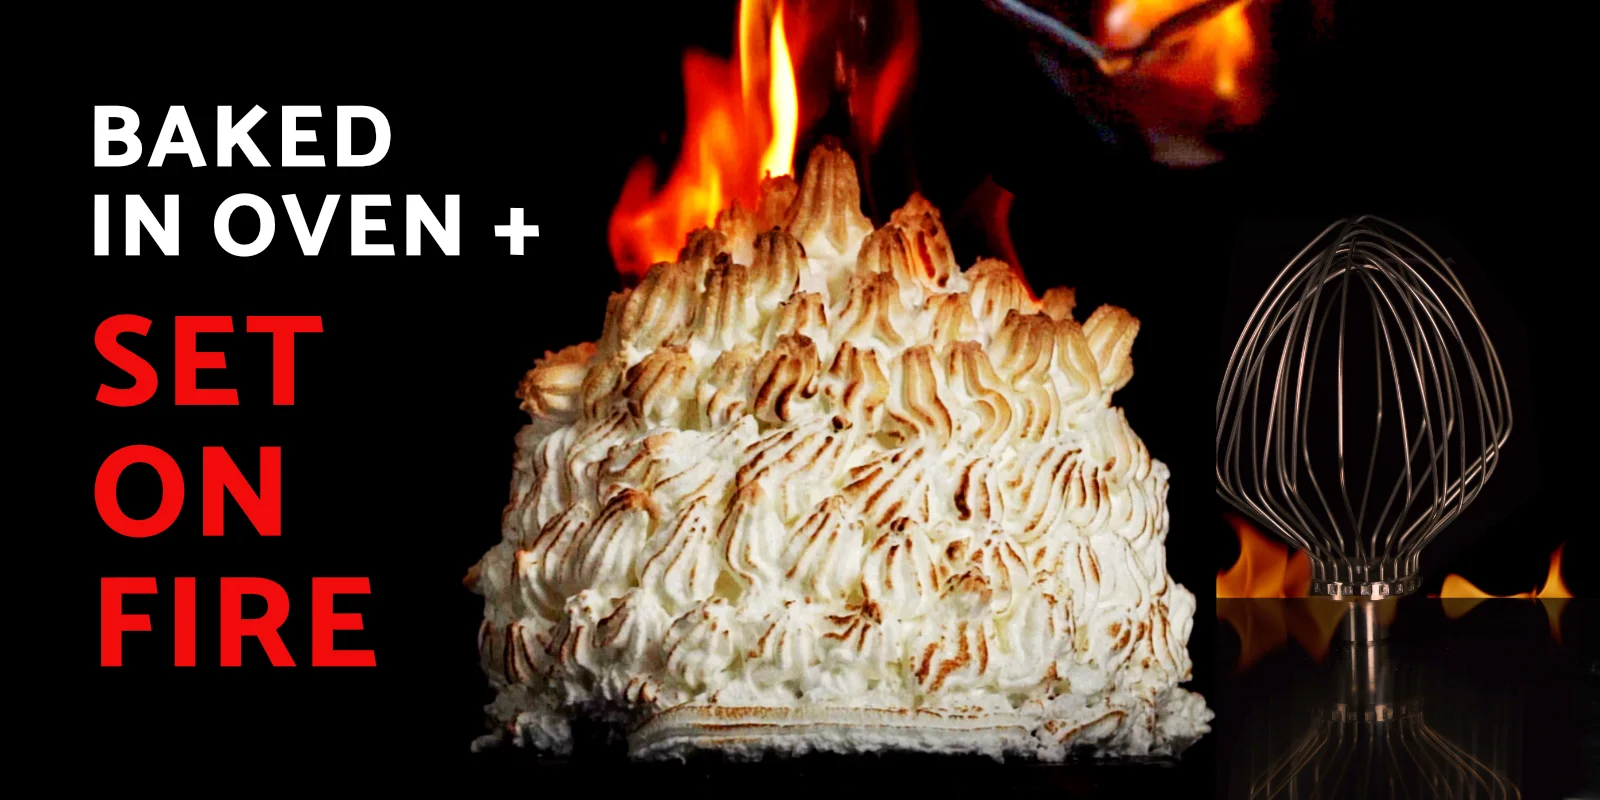
We’ve all heard of it, but what is this magical dessert called the Bombe Alaska? In short, Bombe Alaska is a Baked Alaska that is then set on fire with rum or another liquor. In this guide, we’ll show you how we made our Bombe Alaska recipe from start to finish.
You’ll see it all: from the ice cream cake, to the meringue (hint: this is our insulation) to baking our dessert in the oven and finally set it ablaze! Can the ice cream in our Bombe Alaska take the heat? Check out our video recipe below and find out!
Watch the Video Recipe!
Watch the video recipe for Baked Alaska and Bombe Alaska!

Subscribe to our YouTube Channel
More video recipes? Subscribe to our YouTube Channel (it’s FREE) and click the bell to get notifications when we release a new video recipe!
History of the Baked Alaska and Bombe Alaska
The secret of this amazing dessert? The Swiss Meringue!
This dessert was invented in the 1860’s around the time when a British scientist born in the U.S. discovered that whipped egg whites had a secret superpower: they are great insulators!
Chefs at the time set about to put this scientific discovery to the test by inventing first the Norwegian Omelette, then in the United States a dessert called ‘Alaska Florida’—which later became known as the Baked Alaska!
Other historians say the name was given to this dessert to poke fun at the U.S. purchase of what would become the state of Alaska from Russian in 1867. It seems many Americans at the time thought this purchase was rather foolish.
The original Baked Alaska featured exotic banana ice cream and a walnut spice cake and the meringue was toasted in an oven. Word has it, this dessert cost a whopping $40 a slice, in modern currency.
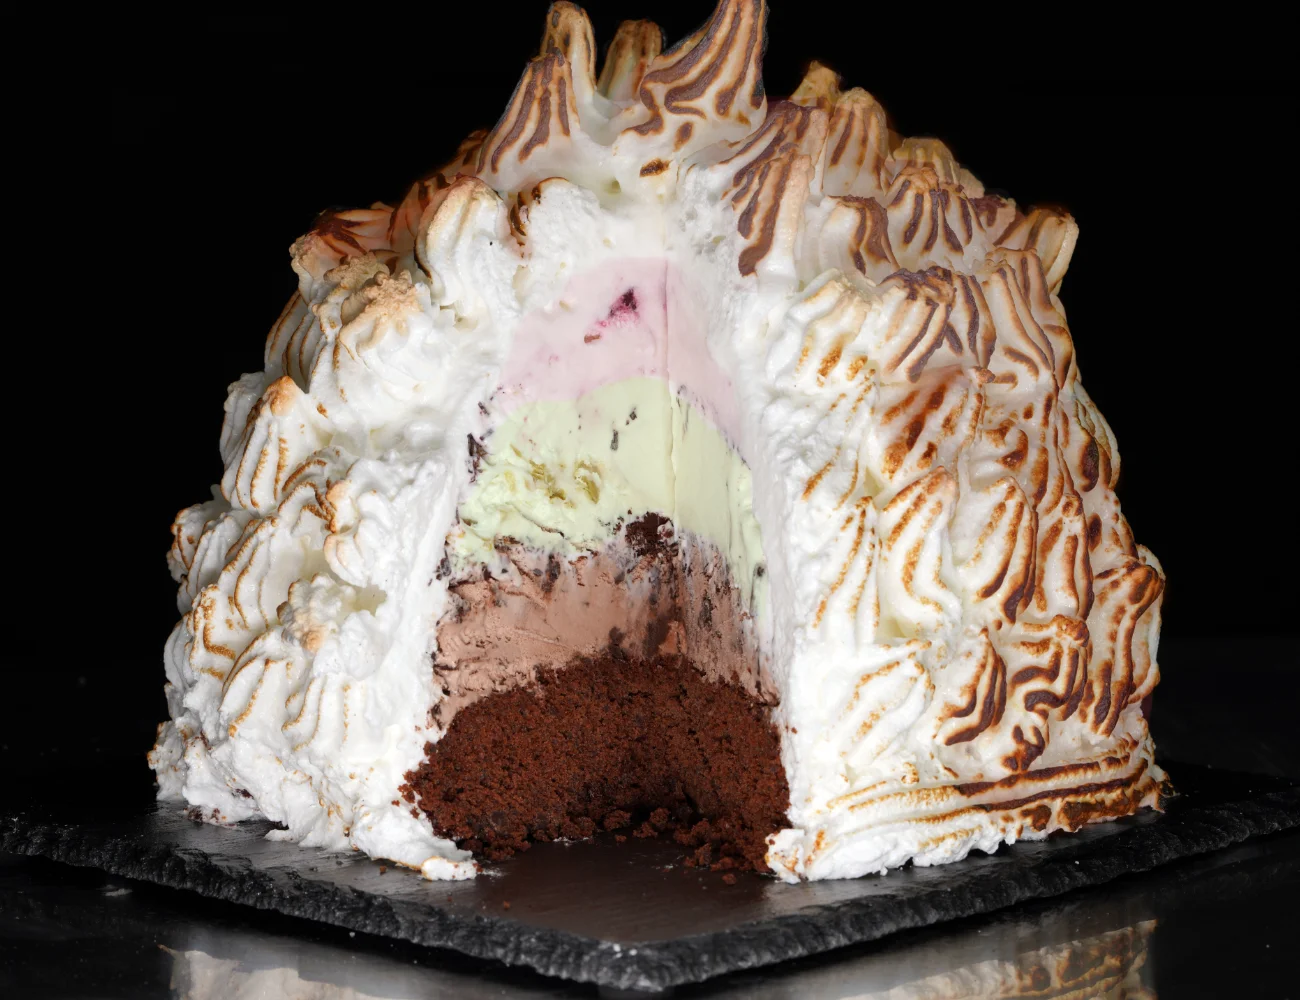
And in fact it is egg whites—whipped into a meringue that covers the entire ice cream cake—which protects the ice cream from melting when this cake is baked and/or set on fire!
Bombe Alaska Recipe: The Ingredients
Ice Cream: Two or Three Flavors!
For a large Bombe Alaska, you’ll need about 4 pounds (2 kg) of your favorite ice cream or gelato. It’s best to use two to three flavors if you want to create the attractive layers that this cake is famous for!
For our Bombe Alaska, we chose three Italian gelato flavors that we know go well together:
- amarena (sour cherry)
- hazelnut
- and pistachio
Dense Cake for the Base
For the base of a Bombe Alaska, you need to make one layer of a relatively dense cake (your choice). It should be a flavor that will go well with your ice cream or gelato flavors and it should be at least 1 inch (2.5 cm) high. This cake will form the first line of defense between the oven heat and our ice cream, so be sure it’s not too short.
We say ‘dense’ because you don’t want to use a pan di spagna, an Angel Food cake or some other airy, light cake here. That’s because the weight of all of that frozen ice cream needs to be supported by the cake. We don’t want our cake collapsing under that weight.
You’ll need a cake that is about 8-9 inches (22 cm) in diameter. We chose a dark chocolate chiffon cake for our base!
Swiss Meringue
Swiss Meringue forms the insulation for our Bombe Alaska! That means we need to make enough Swiss Meringue to cover the entire cake (down to the base). The Swiss Meringue should be about 1 inch (2.5 cm) thick to create a secure layer of insulation between the heat and the ice cream.
A Swiss Meringue prepared in the way we are showing here should be cooked enough to kill any bacteria that could cause foodborne illness.
Rum or Other Liquor
We just need a small amount of rum or another liquor to put the bomb in our Bombe Alaska!
How to Make Bombe Alaska
Bake a Cake
To make an ice cream cake for the Baked Alaska and Bombe Alaska, you’ll need a round mixing bowl that is just a bit smaller on the top than the cake. This will ensure that the cake ‘base’ covers and protects the ice cream layers sitting on top of it.
We baked our cake in a 8-9 inch round (22 cm pan). We chose to follow our Dark Chocolate Chiffon Cake recipe. Let the cake cool thoroughly before using it.
Make the Ice Cream Cake
To make an ice cream cake, you need a round bowl that is just a bit smaller than the cake you’ve prepared. We’ve selected a bowl with a mouth just a bit smaller than our 9 inch cake pan. We are using a glass Pyrex mixing bowl.
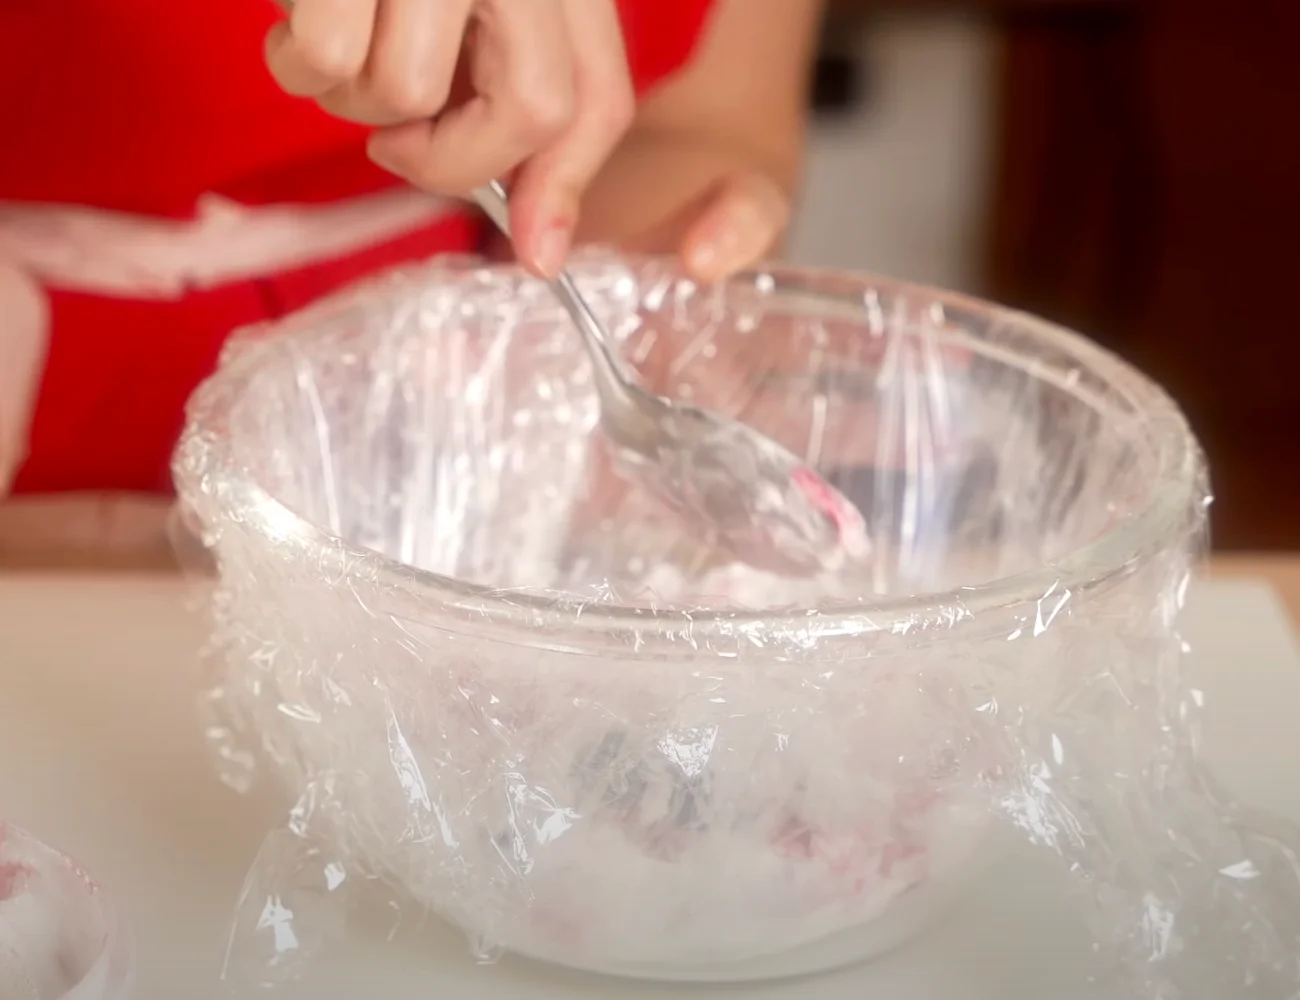
Cover Inside with Plastic Wrap
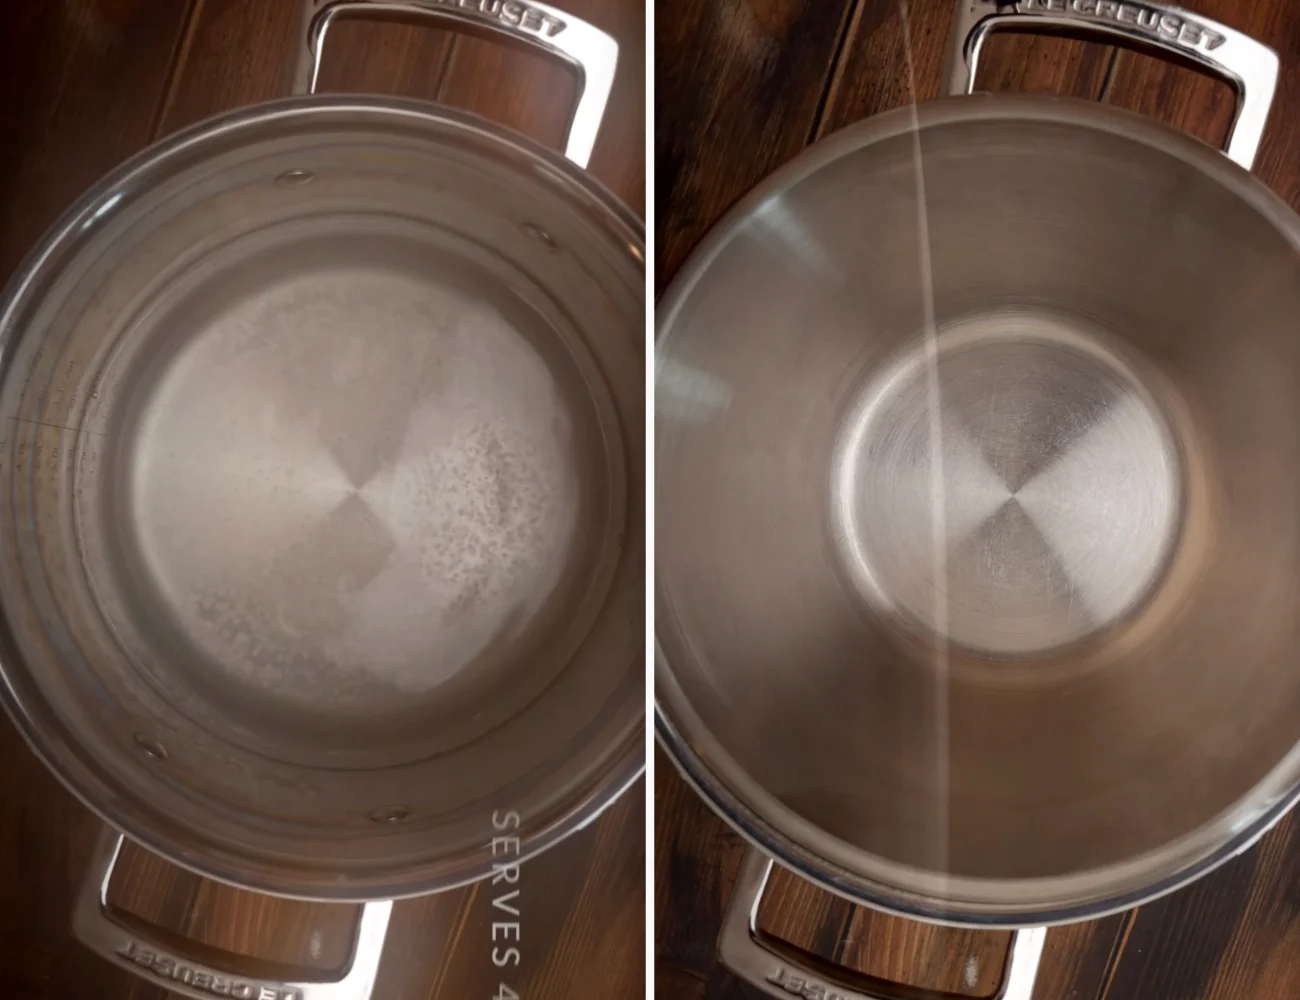
Cover the entire inside of the bowl with plastic wrap. It’s critical that you cover the entire inside of your bowl with plastic wrap and let it hang over the sides. Otherwise, we have no chance of getting our ice cream mold out of the bowl!
Smooth the plastic as much as you can, however it’s ok if there are some wrinkles. We will be covering the whole thing in Swiss Meringue later, so it doesn’t have to be pretty 🙂
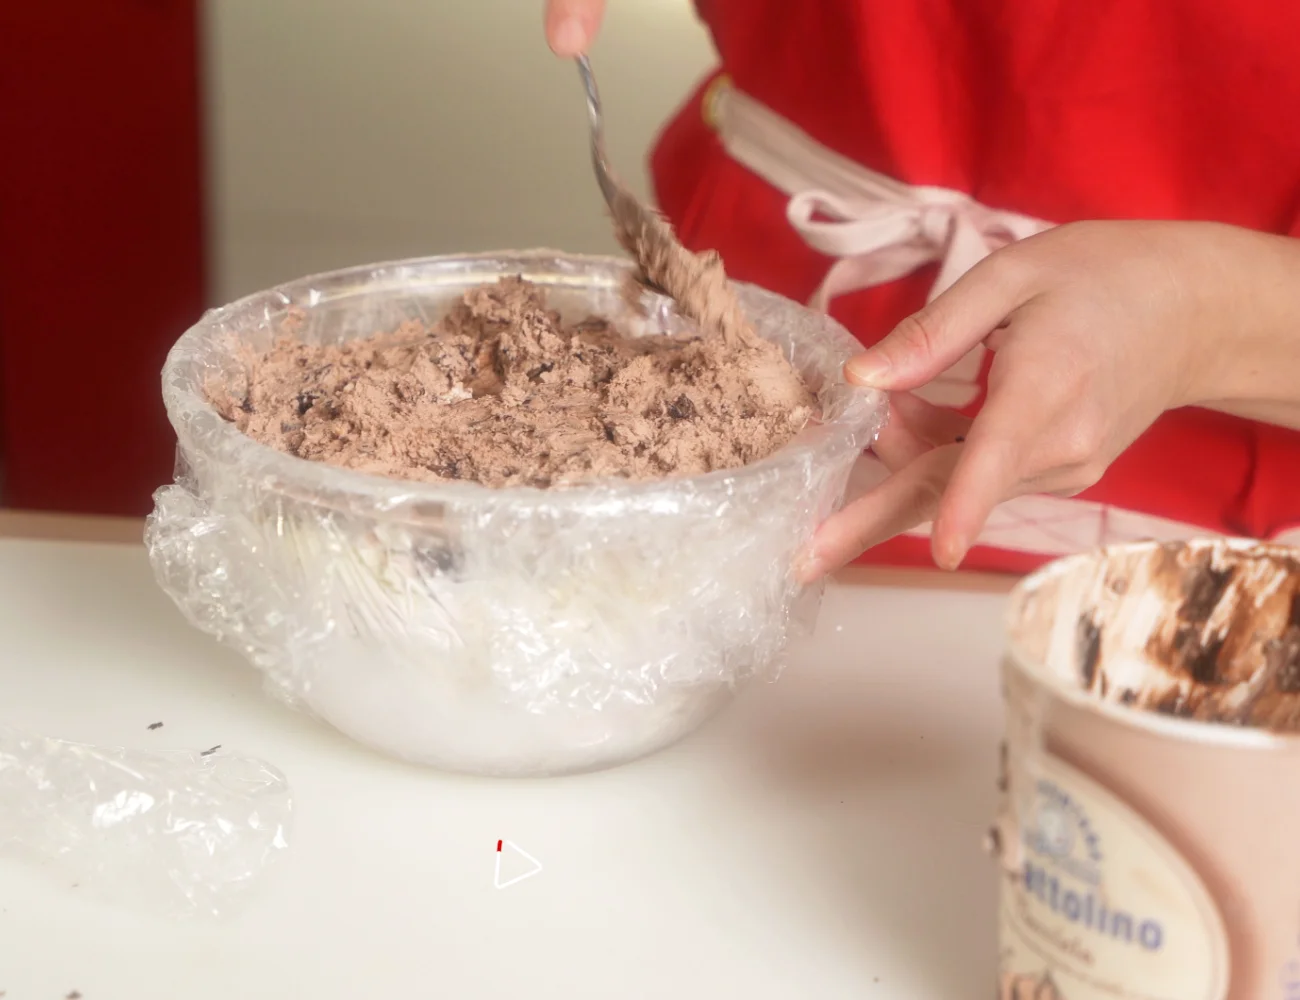
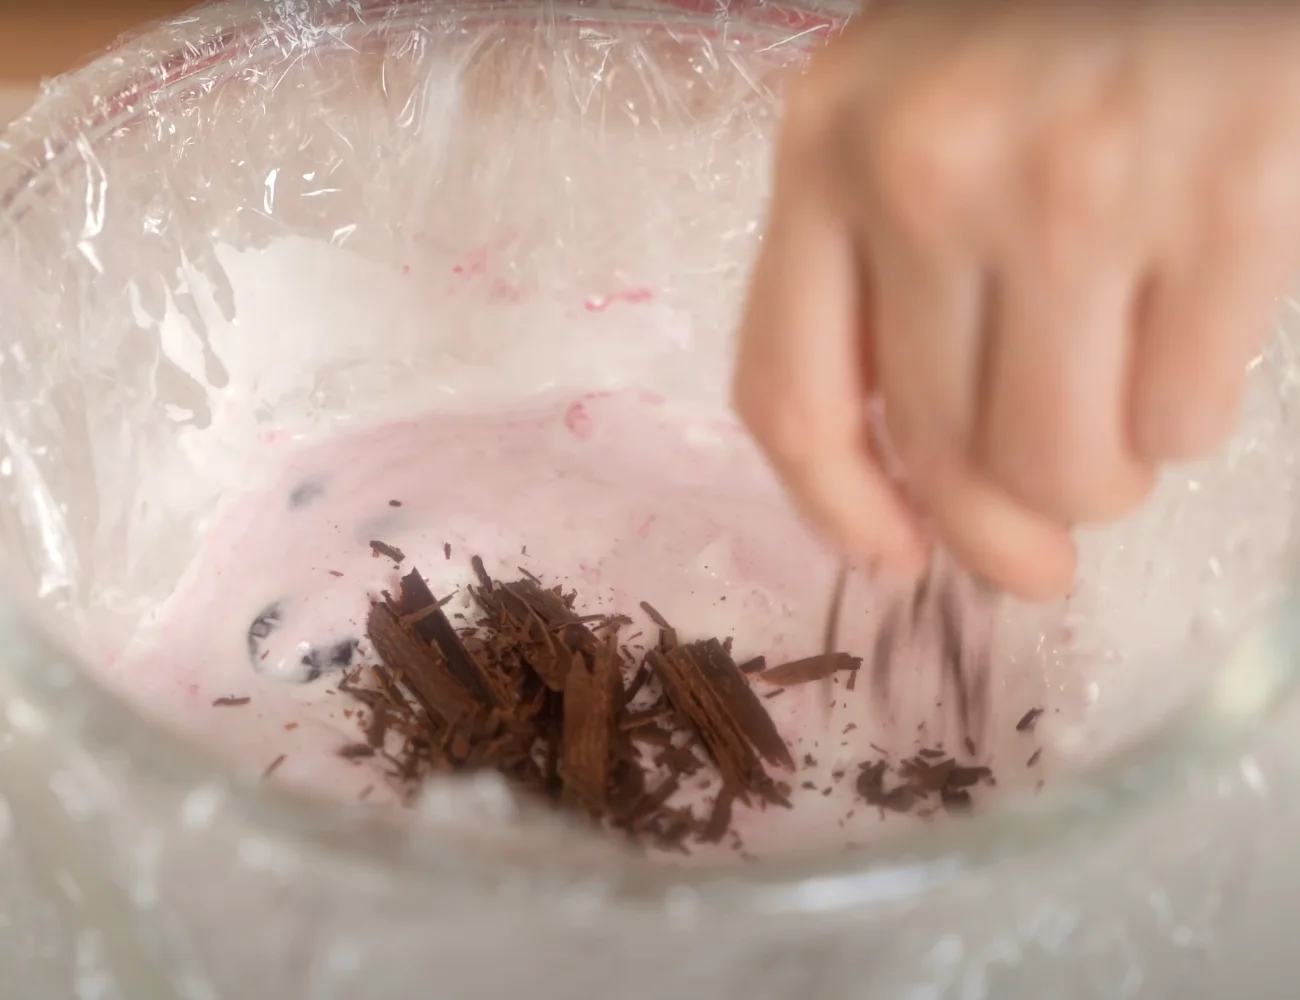
Layer the Ice Cream- Freeze Between Each Layer!
You’ll need about 4 pounds (2 kg) of ice cream or gelato in total. Choose 2-3 different flavors for a layered cake. Ice cream with strikingly different colors will be even more eye-catching.
The ice cream / gelato should be soft enough to easily spoon and spread, so remove the flavor you are working with from the freezer a bit before trying to add it to the bowl.
If using 3 different flavors, fill the bottom of the bowl 1/3 of the way up the bowl for each layer of ice cream you are adding. We want the layers to be more or less even in height.
For the best definition between layers, freeze the ice cream for about 2 hours between each layer.
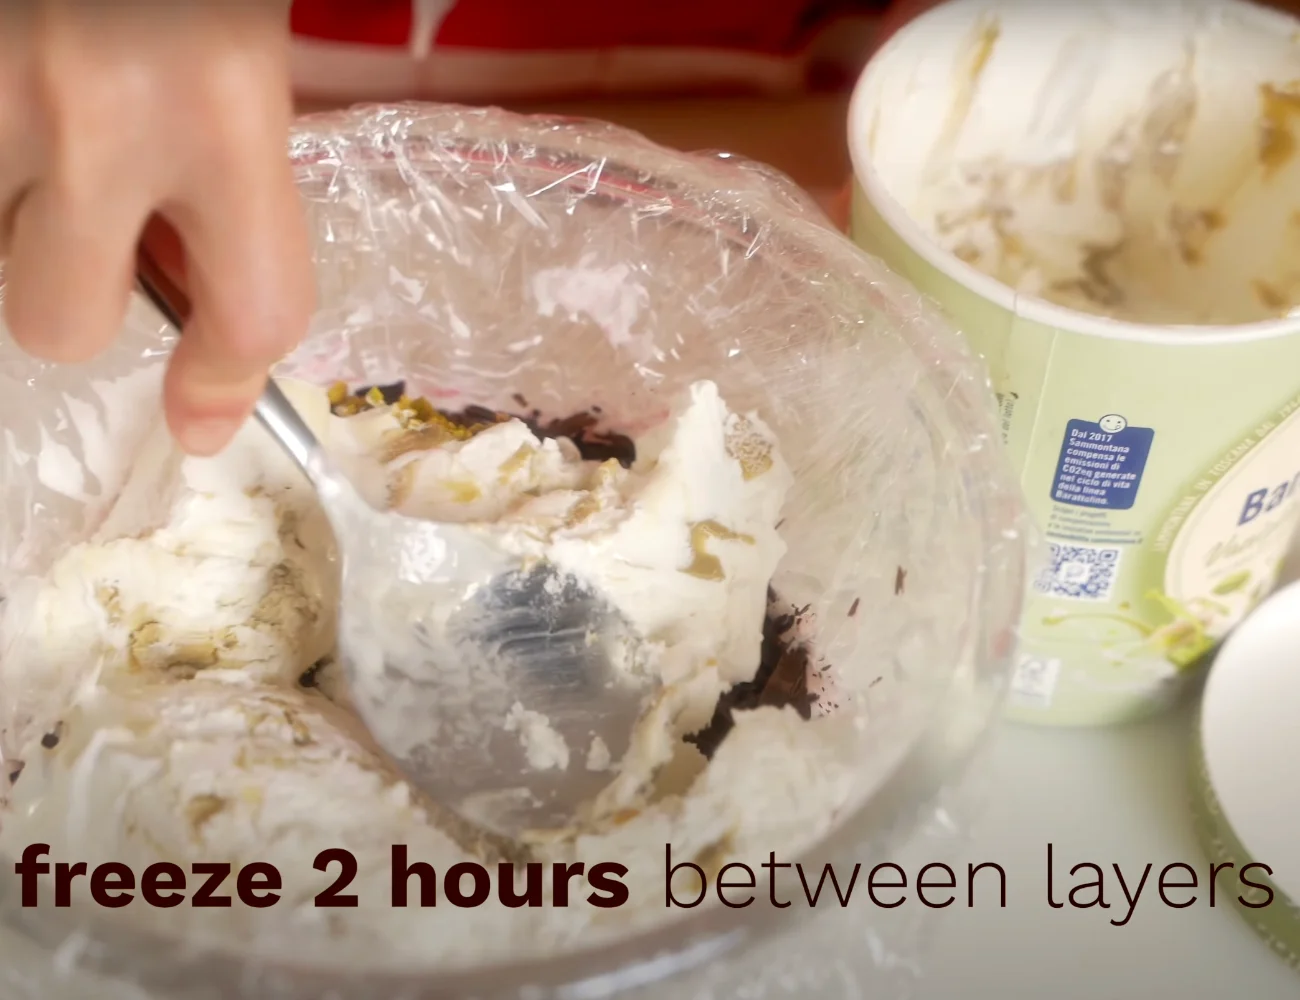
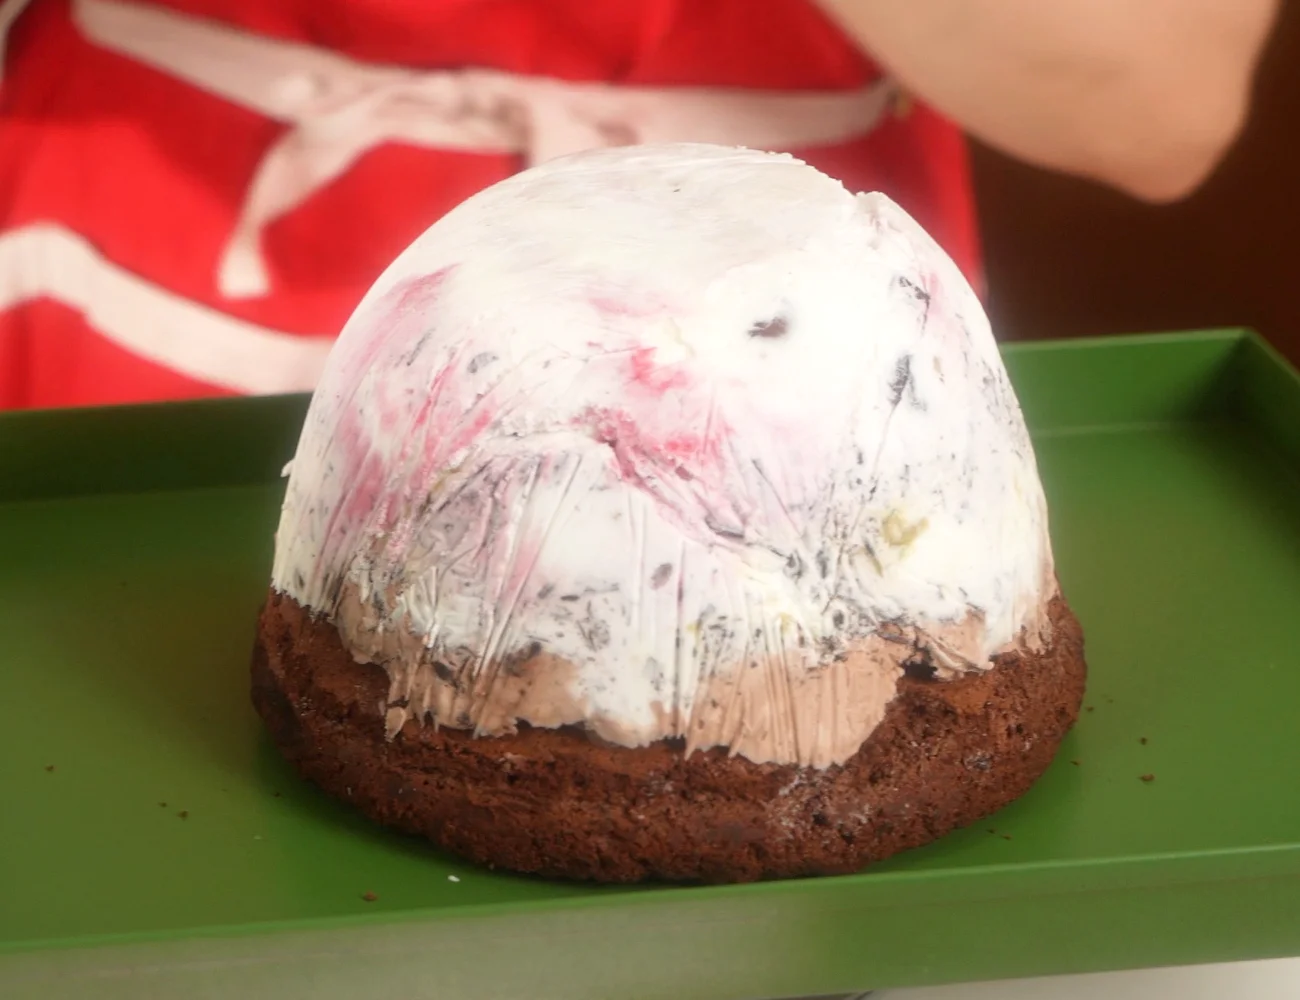
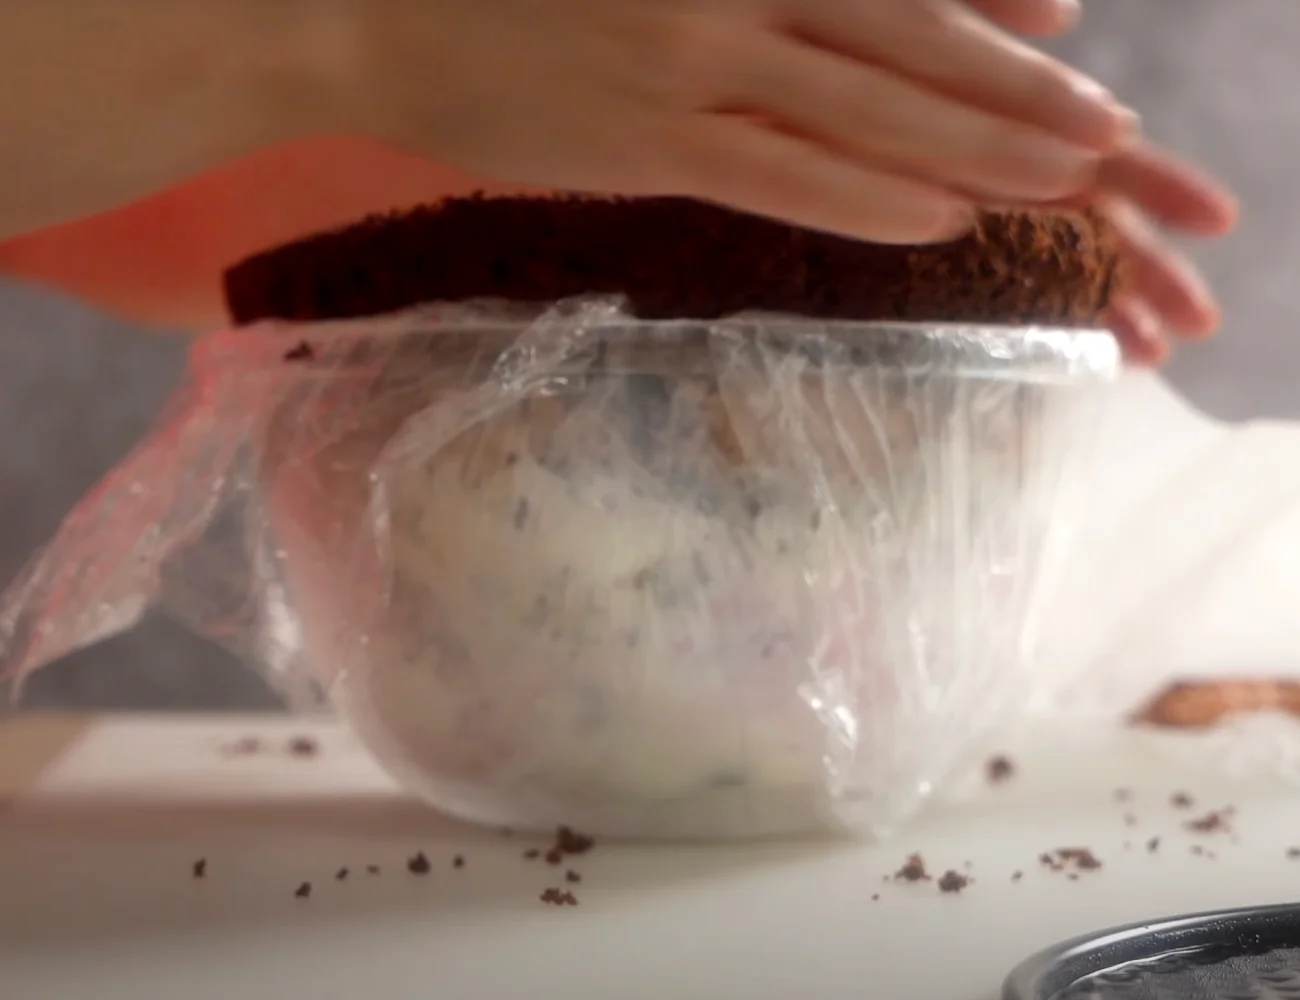
Top with the Cake Base
Finally, top the last layer of gelato with the layer of cake. When we turn the frozen cake upside down, this cake will form the base of our ice cream cake!
We recommend loosely wrapping the cake against the ice cream with plastic wrap. Then, you want to freeze the ice cream cake for at least 3 hours or even overnight.

Make the Swiss Meringue
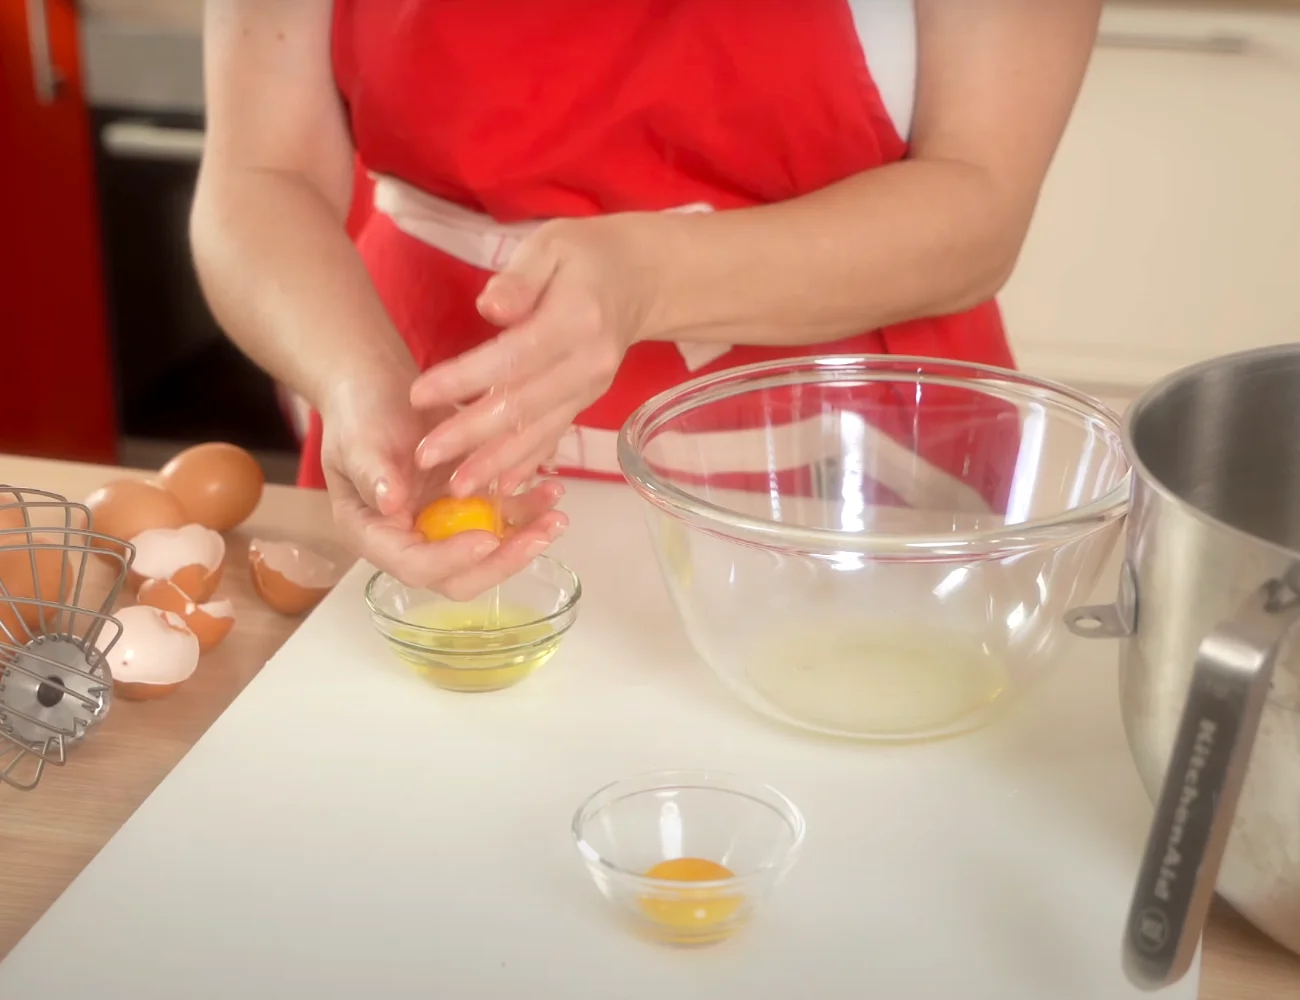
Prepare the Egg Whites
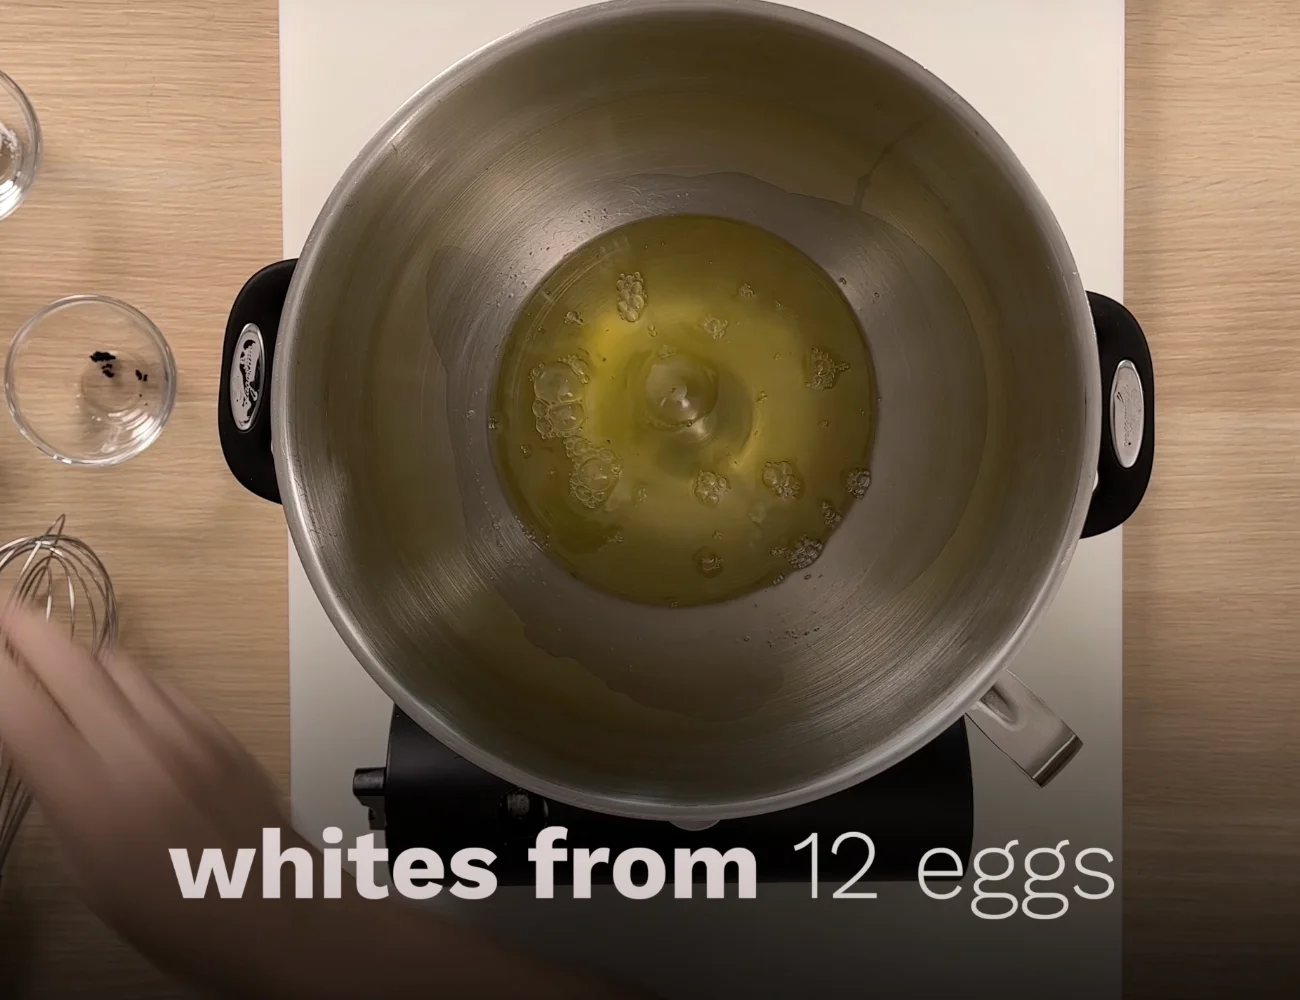
We need the whites of about 12 eggs to make enough Swiss Meringue to cover this cake! This means we need to separate the eggs (yolks from the whites) cleanly in order to be sure there is no yolk in the whites that we will be whipping.
How to Separate Eggs (Whites from Yolks)
Egg whites will not whip properly if there is any fat or grease in them—that includes the egg yolk! So, we need to crack our eggs to be sure no yolks bleed into the whites.
Here are our tips for cleanly separating egg whites from yolks:
- all bowls should be clean—free of fat or grease
- crack eggs when they are cold (just out of the fridge)—they will separate more cleanly
- crack each new egg over a smaller bowl, using your hand to catch the yolk
- if the egg white is clean (no yolk), transfer it to the larger bowl where you are putting the whites
Why the second smaller bowl? Cracking each egg over a second bowl allows you to be sure the whites from that egg have no broken yolk before transferring the whites to the bowl of cleanly separated whites. If you crack each new egg over the bowl of clean whites, one mistake (a bit of yolk getting through) can destroy the entire batch of whites. This is annoying and a waste of eggs!
Why Separate Eggs Cold?
You’ve probably read that egg whites whip better warm. For this reason, some people make the mistake of leaving their eggs out to come to room temperature in the shell before cracking them. This is a bad idea because the yolks in room temperature eggs tend to be more prone to busting open when you try to separate the eggs.
It’s much better to separate eggs cold, then bring the egg whites to whatever temperature you want them to be to whip them. For making Swiss Meringue, we actually need to warm the whites considerably before whipping them.
Warm the Egg Whites + Sugar
To make a Swiss Meringue, we need to use a double boiler—called a bagnomaria in Italian. This allows us to use indirect heat to gently heat our sugar and egg whites.
Add about an inch of water to the bottom of a pot. The pot should be big enough to hold the bowl with the egg whites and allow the bottom of that bowl to just touch the water or be suspended above it. We want this bagnomaria to be simmering very gently.
In other recipes, you’d remove the hot water bath and bowl from the heat entirely. The heat from the hot water is enough in those cases to continue warming the ingredients—to melt chocolate for example!
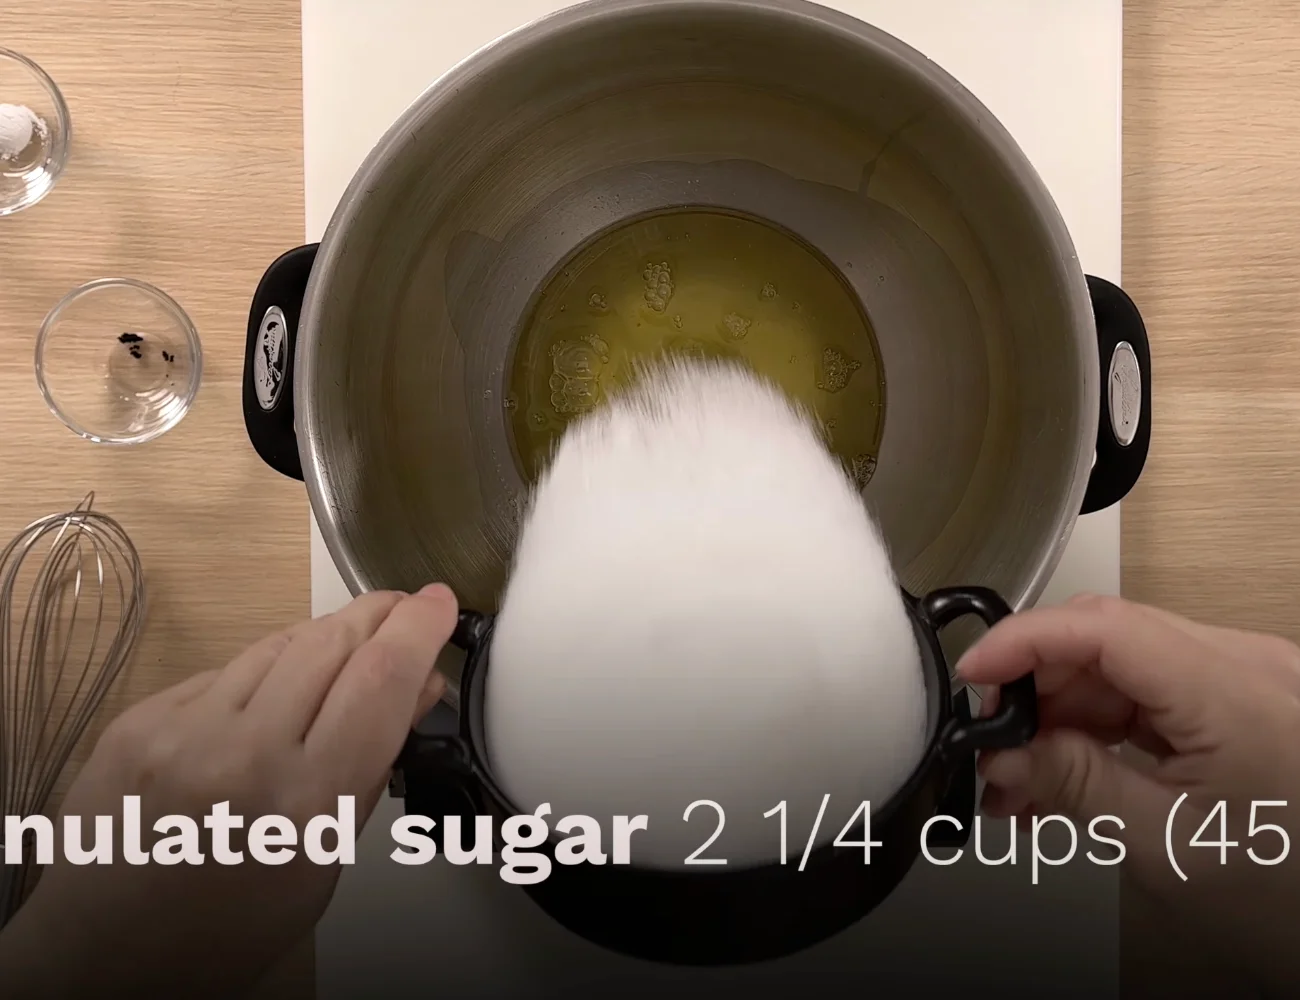
There are two parts to making a Swiss Meringue. First we need to dissolve granulated sugar into egg whites, warming the mixture while whisking frequently.
To do this, we combine about 2 1/4 cups of granulated sugar with the whites of 12 eggs.
If we warm the eggs and sugar enough, we can effectively kill food any bacteria that might be in the egg whites, making this meringue safe to eat without any further cooking.
At first the eggs and sugar will be dense and hard to whisk. Then, the sugar will dissolve and the mixture will be thin and easy to whisk. Finally, the eggs will begin to froth. At this point, we need to watch our temperature very closely, whisking continuously.
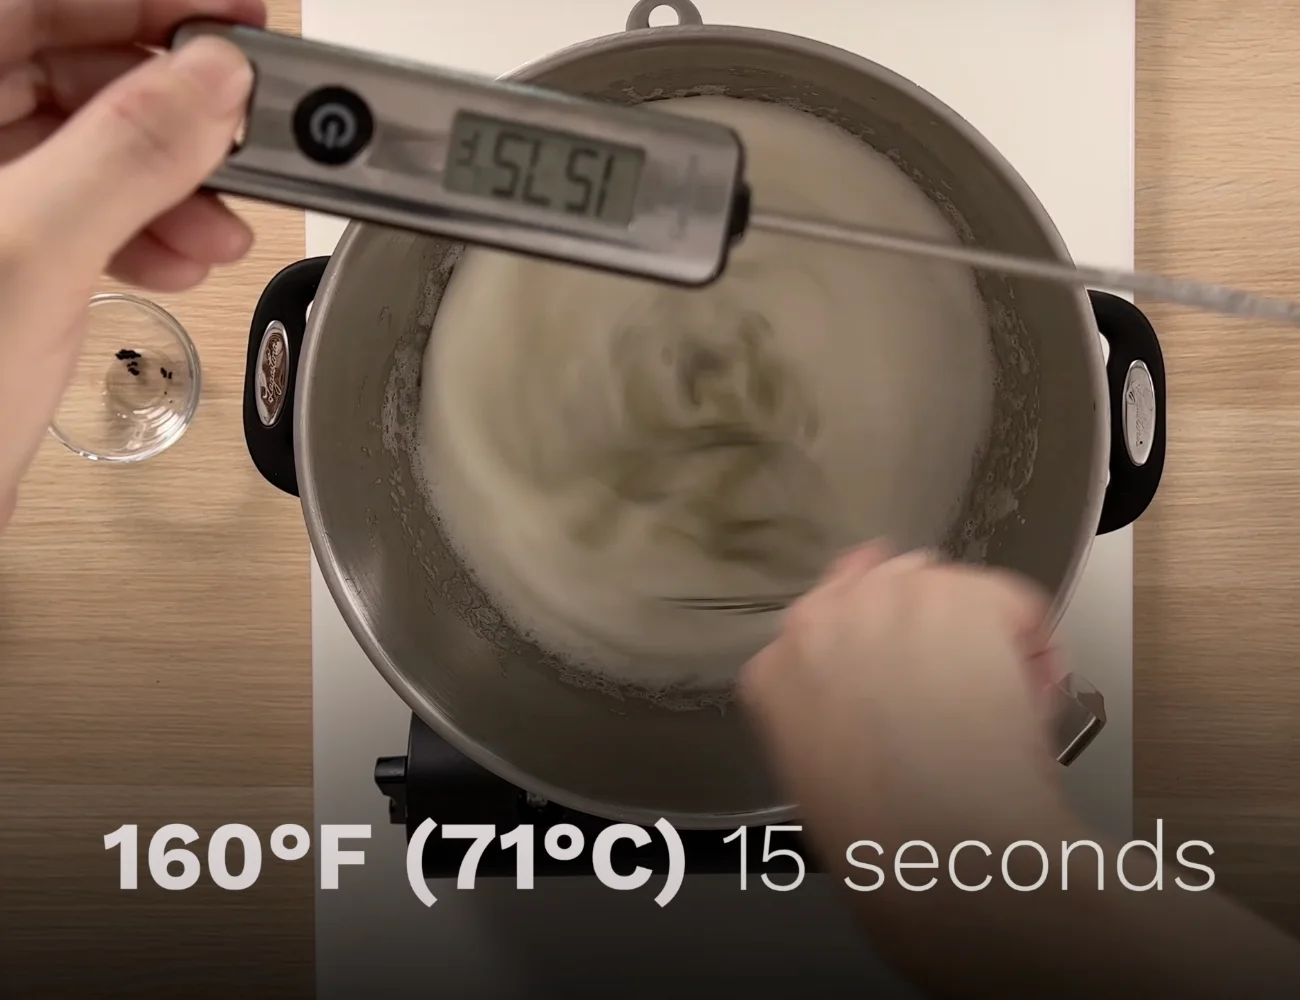
When we reach 160° F (71° C), we need to continue cooking and whisking the eggs for 15 seconds.
Whisk Warm Eggs on High
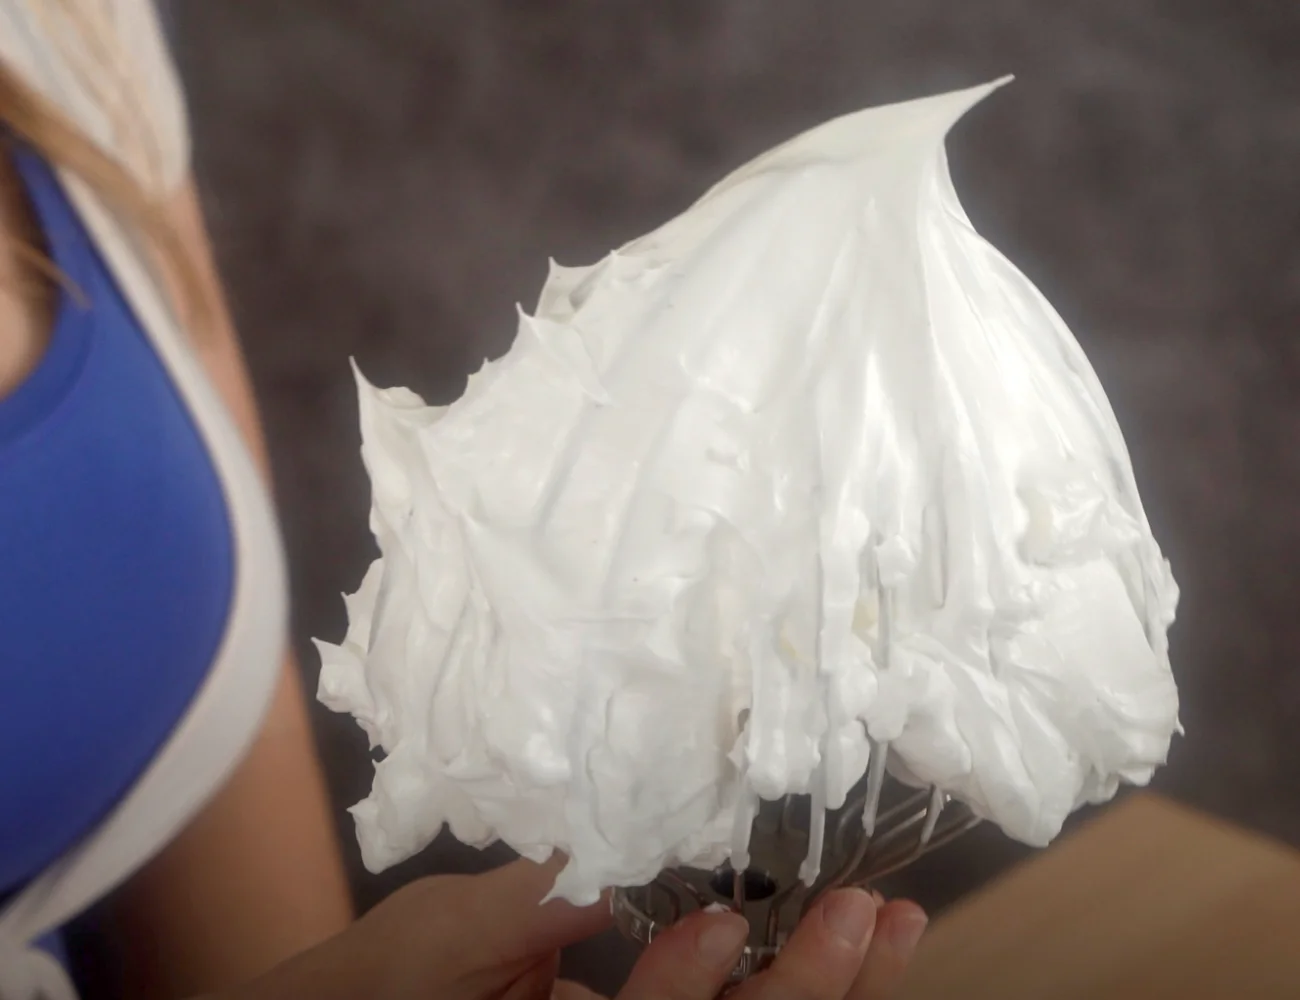
Remove the eggs from the heat. Using a stand mixer or hand mixer with a whisk attachment, whip the warm egg whites on high speed for about 5 minutes— or until you have firm to stiff peaks.
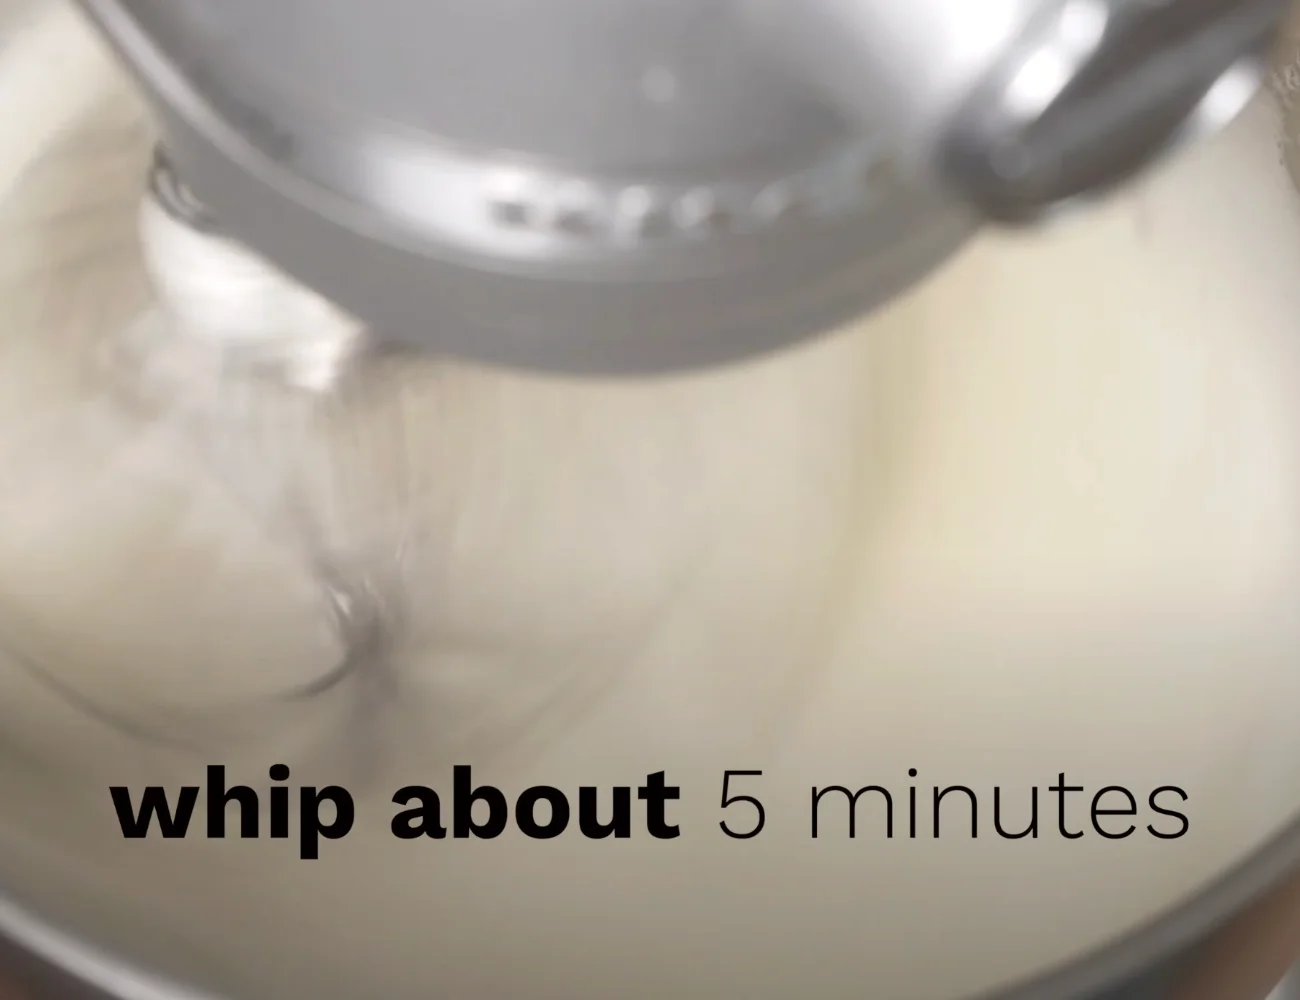
We add a bit of cream of tartar for extra stability and a half a vanilla bean for extra flavor.
Very firm meringue have peaks that stand up straight— with a tiny curve at the top! Now you’ve learned how to make a Swiss Meringue!
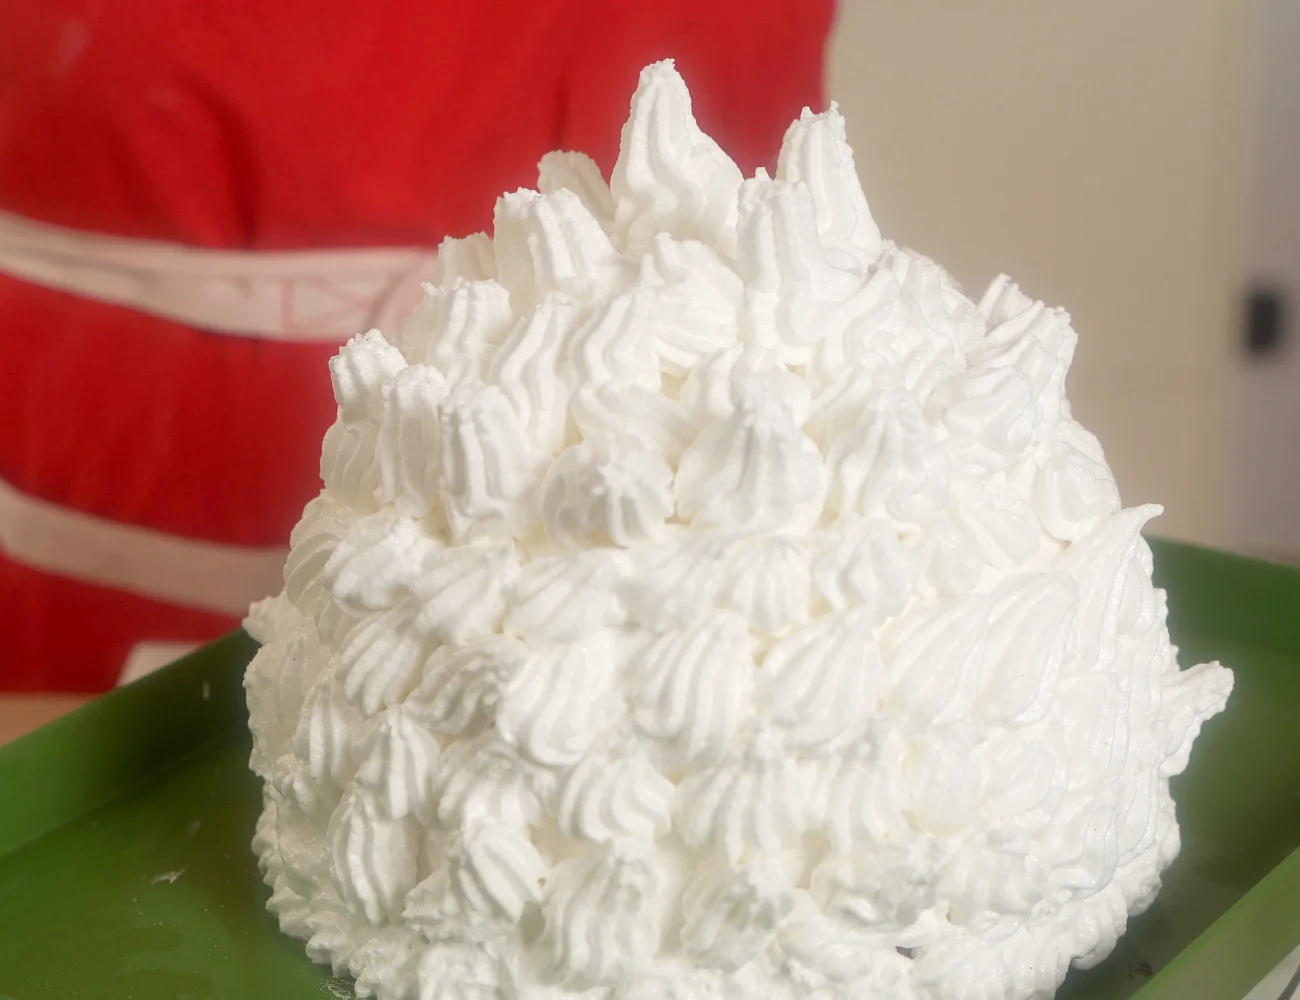
Cover the Frozen Cake in Swiss Meringue
Time to add the insulation to our ice cream cake! Since this cake is going into the oven, we assemble it on a heat-safe baking tray.
Take the frozen ice cream cake out of the freezer and turn it upside down on a heat-safe baking tray. It’s likely that the bowl will not immediately come off. If this happens, take a kitchen blow torch to the sides until it loosens. Or, set the bowl in some warm water until the bowl can be removed. We use our kitchen blow torch!
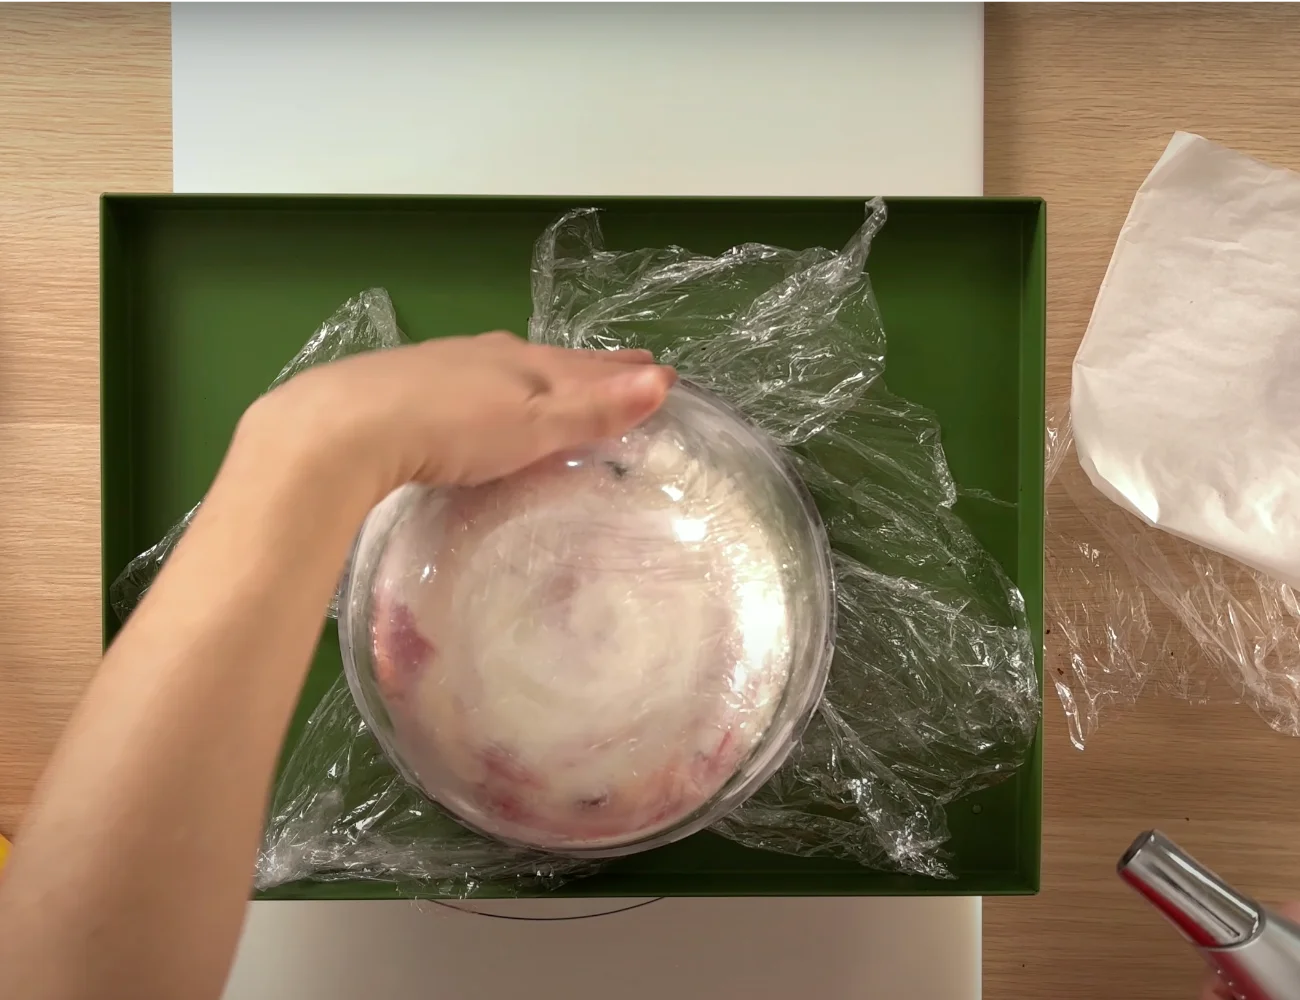
Then, remove the plastic wrap from the ice cream cake.
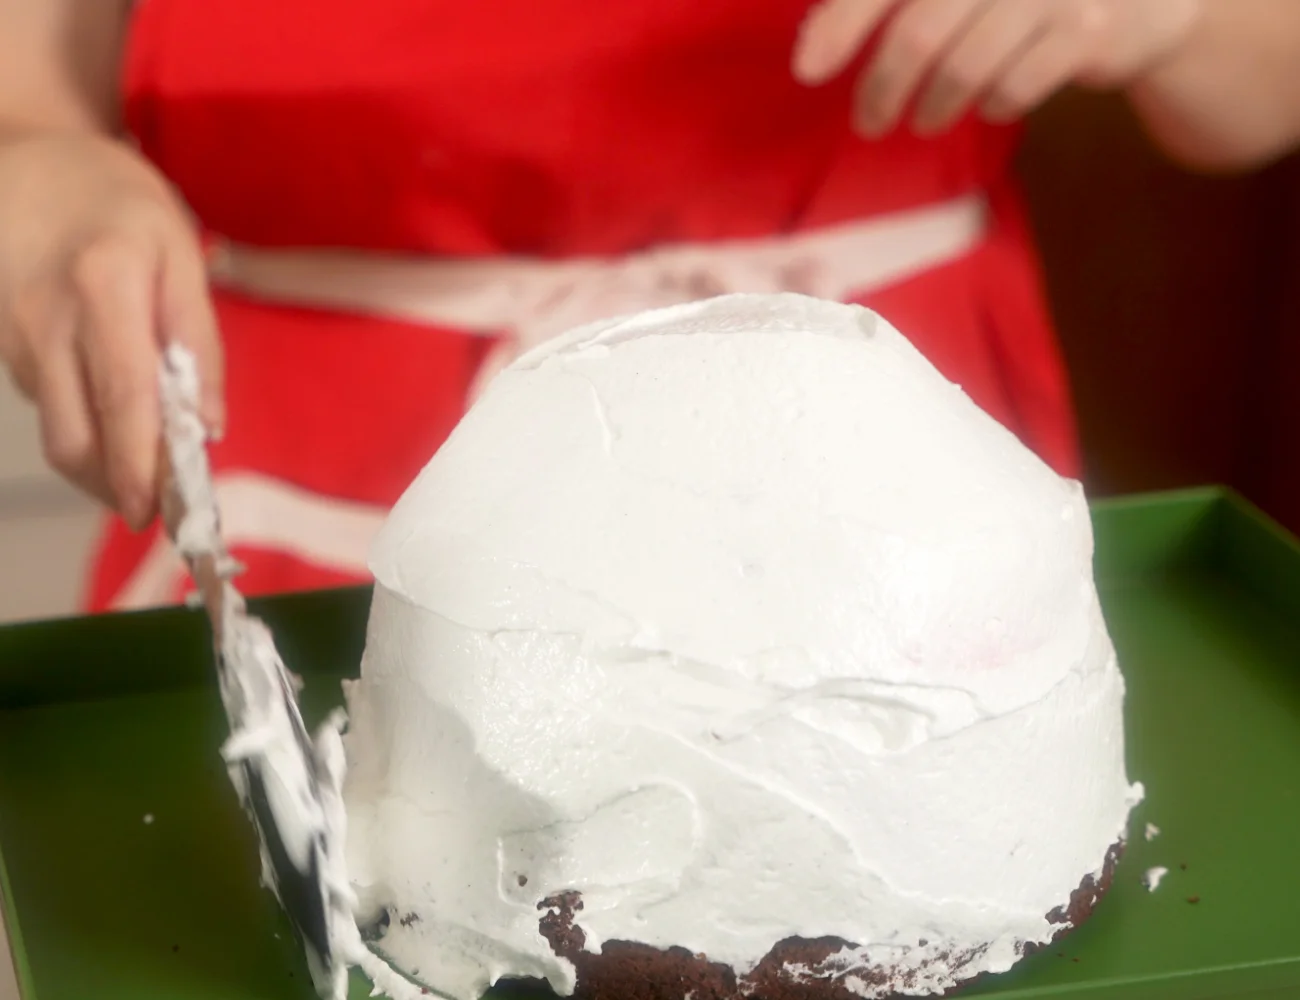
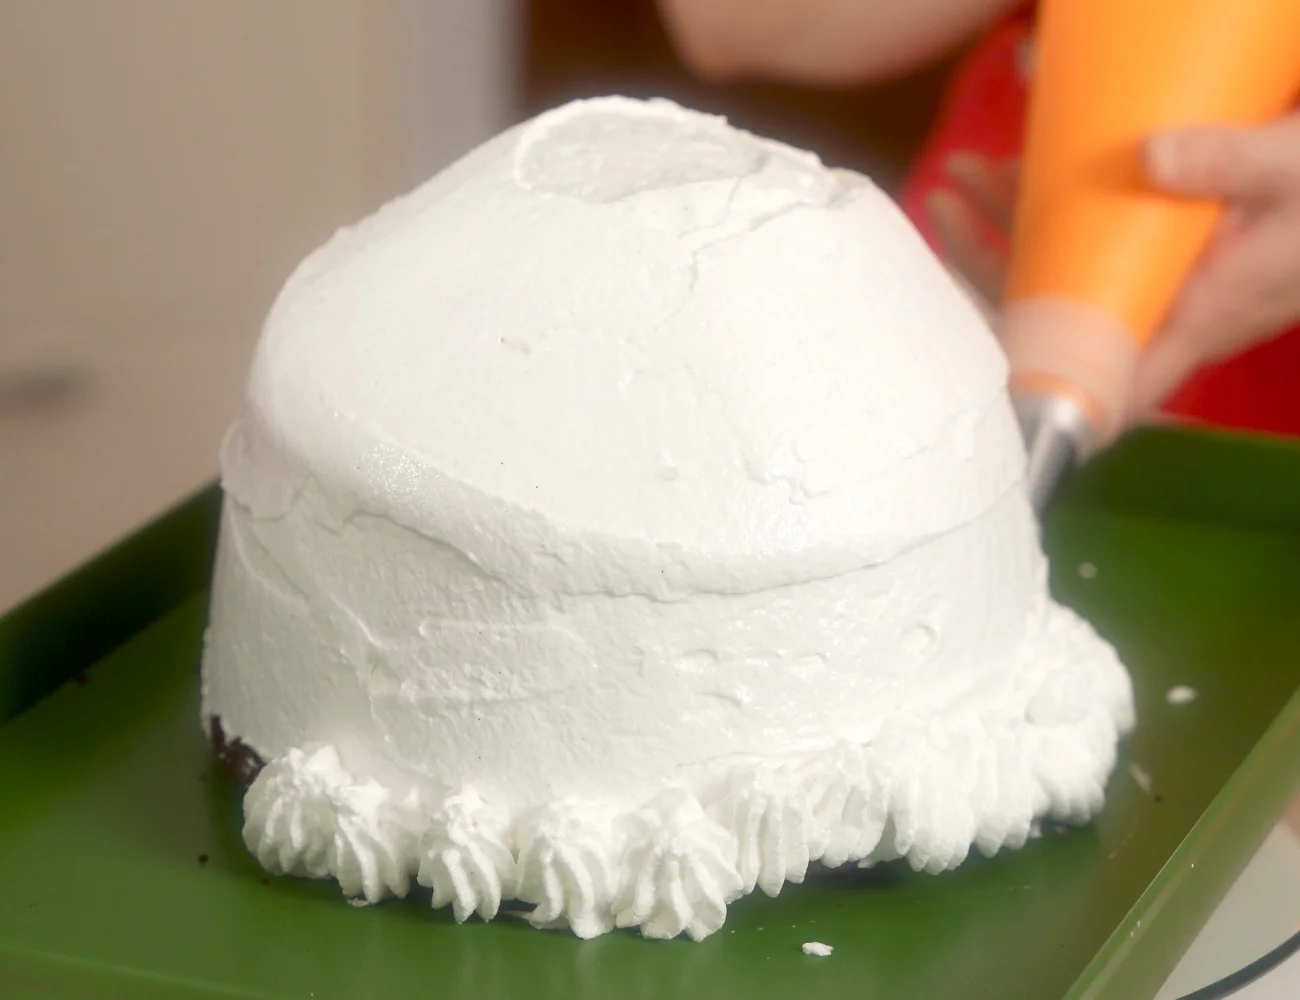
Now we want to quickly encase our entire cake with the Swiss Meringue we’ve prepared— adding a layer about 1” thick.
if you want to create a piped-on decoration, transfer some of the Swiss Meringue to a pastry bag, as we’re doing here.
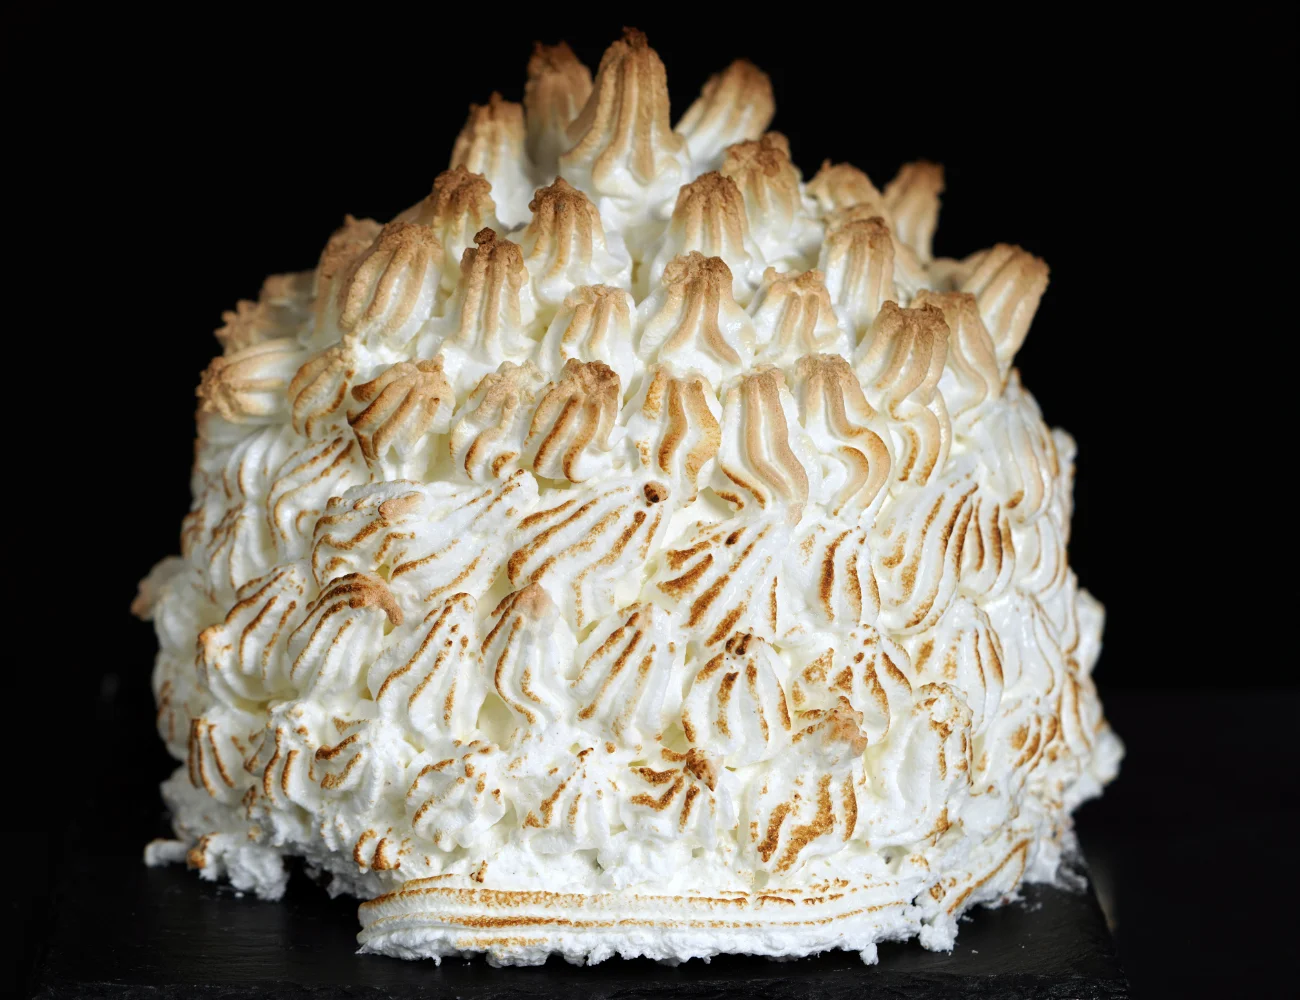
Bake the Baked Alaska… in the Oven!
As we will discuss in our guide to the Baked Alaska, this dessert originated to demonstrate an amazing scientific discovery of the 1800’s: That whipped eggs make a great insulator!
We’ve noticed that these days, many cooks lose the courage to put their Baked Alaska or Bombe Alaska in the oven at this stage—choosing to just toast the outside of the Swiss Meringue with a kitchen blow torch. If you want to do that, it’s fine. However, we like to recreate that amazing scientific experiment to prove our Baked Alaska can take the heat before we then set it on fire to make a Bombe Alaska!
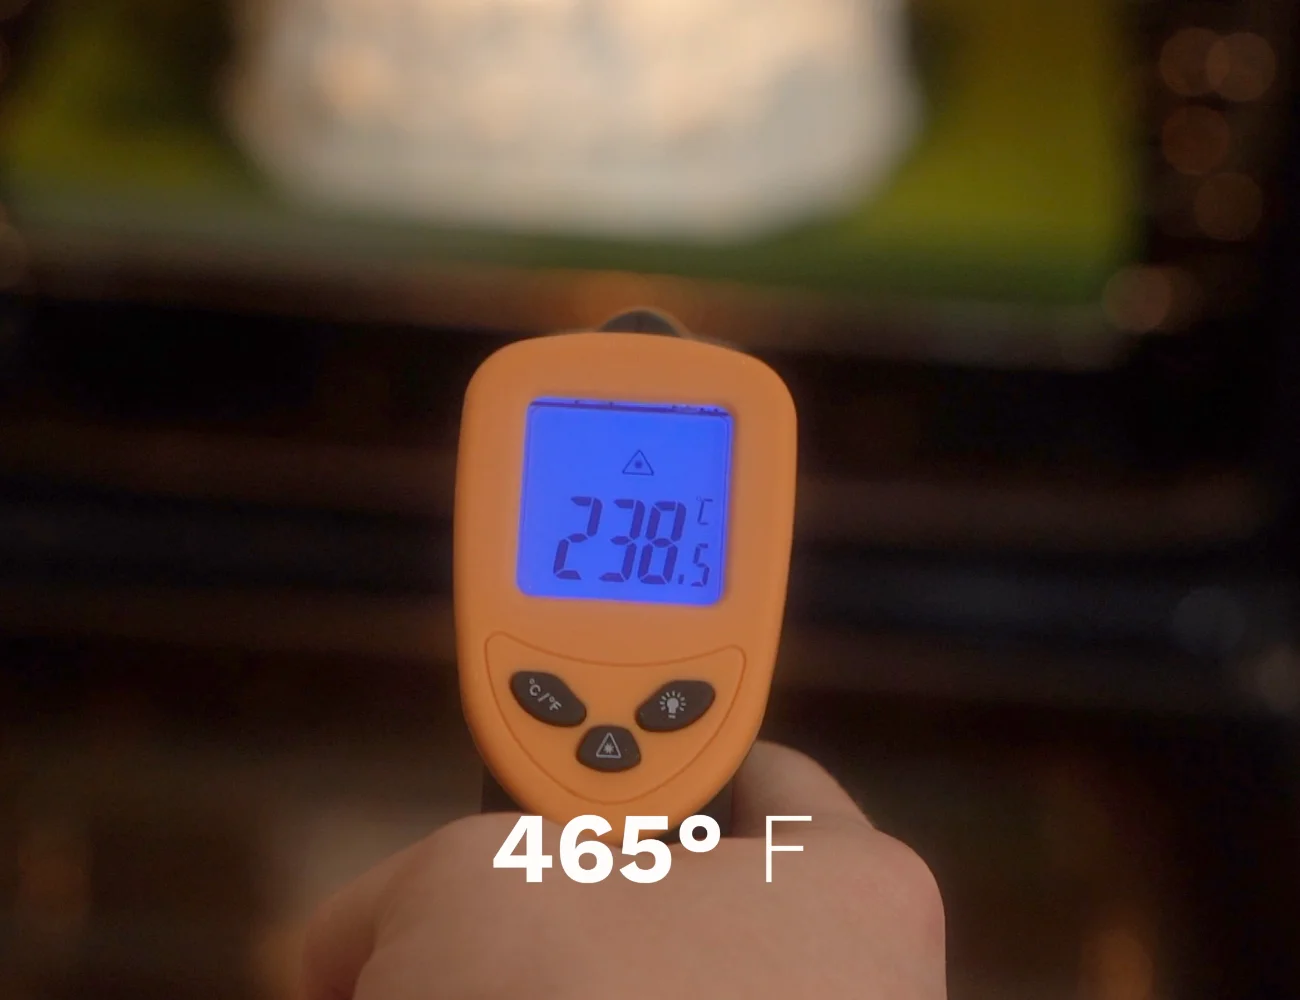
Bake at 465° F (240° C) for 5 minutes. At this point, the top of the cake will look toasted on the outside and you can add some color to the bottom with the blow torch.
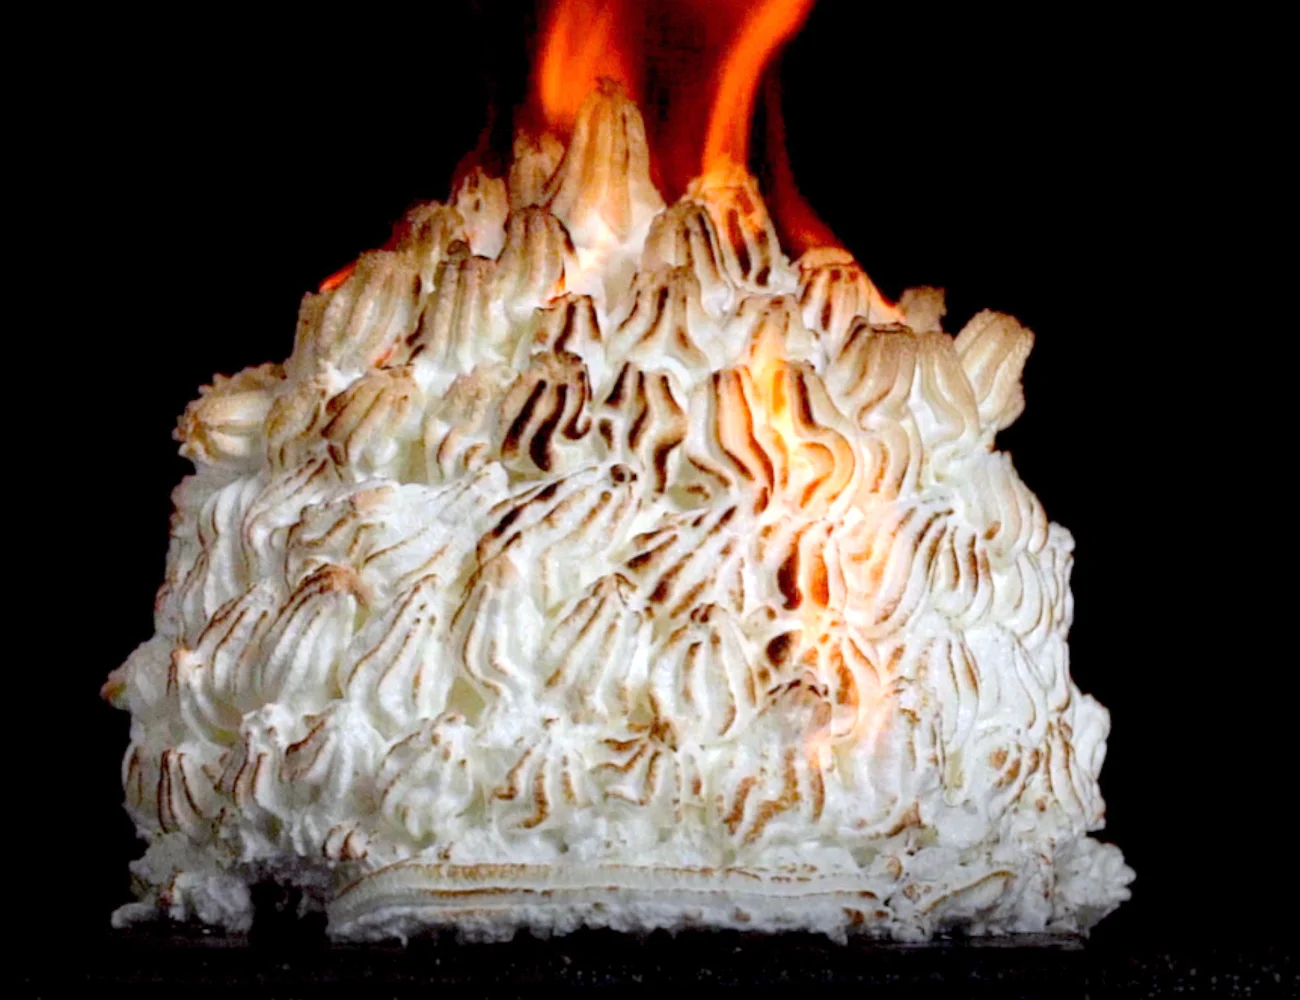
Make the Bombe Alaska!
So how did we turn our Baked Alaska into a Bombe Alaska in the video? First, we made sure the Baked Alaska was sitting on a heat-proof surface.
We then sprayed some rum on the outside of the cake (you can also sprinkle) and added a small amount of liquor to a heat safe glass Pyrex measuring cup as well. Finally—using a long utility lighter—we set the rum in the glass cup on fire and poured that rum on fire over our Baked Alaska!
TIPS:
- Take all necessary precautions when working with fire!
- Make sure the Baked Alaska is setting on a heat proof surface
- Don’t add too much liquor—you’ll risk burning the meringue!
- Use high-heat gloves (such as those we share links to below) to handle the fire safety.
Baked Alaska Tips
Tips?
Read the guide above or watch the video recipe. There are too many tips to summarize here—including how to separate and easily whip egg whites!
Choose a Reasonably Dense Cake
The cake forms the base for our Bombe Alaska and needs to support frozen ice cream. A chiffon cake works fine as would other denser cake recipes. Don’t use an Angel Food Cake or pan di spagna cake for this recipe—they are too light to support the ice cream.
Let Ice Cream or Gelato Soften Before Using It
The ice cream / gelato should be soft enough to easily spoon and spread, so remove the flavor you are working with from the freezer a bit before trying to add it to the bowl.
What’s a Double Boiler?
A double boiler can be made with any mixing bowl that fits inside or over a sauce pan. Add about an inch of water to the bottom of the sauce pan.
In this case, the sauce pan should be big enough to hold the bowl with the egg whites and allow the bottom of that bowl to just touch the water or be suspended above it. We want the water to be simmering very gently to give us the indirect heat we need to warm our sugar and eggs.
Get Creative with Flavors
This is a fun dessert to make your own by choosing flavors that you love and want to try together. The original Baked Alaska was rumored to be made with banana ice cream and a walnut cake base.
Prep Time Doesn’t Include Baking Cake
Since we aren’t sure what kind of cake you’ll choose to make (or buy), we haven’t included that in the prep time.
Products Used in the Video (or Comparable)
This video was filmed in Italy, so if the specific brands we purchased aren’t easily available outside of Italy, we’ve included links to comparable products below.
Affiliates links below:
- Kitchenaid Pro 600 Stand Mixer: https://amzn.to/3gVNnBQ
- Pyrex Glass Mixing Bowls: https://amzn.to/2CgSfmx
- High Heat Kitchen Gloves: https://amzn.to/3yzc6qw
- Infrared Thermometer: https://amzn.to/3JCCZAs
As an Amazon Associate, we earn from qualifying purchases. This means at no extra cost to you, PIATTO may earn a small commission if you click the links and make a qualifying purchase.
Discover More Dessert Recipes!
Ultimate Bombe Alaska Recipe (and Video)
Equipment
- 1 stand mixer or hand mixer Ours? Kitchenaid Pro 600: https://amzn.to/3gVNnBQ (affiliate link)
- 1 large bowl about 9" diameter at the top
- 1 pastry bag optional, for decorating the Bombe Alaska
- 1 baking tray
- 1 candy thermometer for checking the temperature of the Swiss Meringue
- 1 double boiler (homemade) pot + bowl for making the Swiss Meringue
- 1 pair of high heat gloves optional, for fire safety
- 1 kitchen blow torch optional: to add toasted accents to the Swiss Meringue and loosen bowl from frozen ice cream
- plastic wrap
Ingredients
- 1 baked cake (your choice!) 8-9 inches (22 cm) round
- 4 lbs ice cream or gelato 2-3 flavors for multiple layers
- rum or another similar liquor—for setting the Bombe Alaska on fire!
- Swiss Meringue SEE BELOW
Swiss Meringue
- 12 egg whites
- 2 ¼ cups white granulated sugar
- 1 tsp vanilla extract or ½ vanilla bean
- ¾ tsp cream of tartar
Instructions
Bake (or Buy) the Cake
Make the Ice Cream Cake
- Choose a mixing bowl with a mouth just a bit smaller than size of your baked cake. Cover the entire inside of the bowl with plastic wrap. It’s critical that you cover the entire inside of your bowl with plastic wrap and let it hang over the sides. Otherwise, we have no chance of getting our ice cream mold out of the bowl!4 lbs ice cream or gelato
- Add the first layer of softened ice cream or gelato. If you have 2 flavors, you'll be adding two layers. If you have 3 flavors, make 3 layers. For the best definition between layers, freeze the ice cream for about 2 hours between each layer before adding the next layer.
- Top the final layer of ice cream or gelato with the cooled, baked cake. When we turn the frozen cake upside down, this cake will form the base of our ice cream cake!
- We recommend loosely wrapping the cake against the ice cream with plastic wrap to keep everything together. Freeze the ice cream cake for at least 3 hours or even overnight.
Make the Swiss Meringue
- Separate the whites from the yolks of the eggs. We only need the whites for this recipe.12 egg whites
- Add the whites and granulated sugar to a bowl sitting over a pot of gently simmering water. This is called a double boiler and it allows us to use indirect heat to gently heat our sugar and egg whites.2 ¼ cups white granulated sugar
- Combine the granulated sugar with the egg whites. Warm the mixture over a gently simmering double boiler to dissolve the granulated sugar into egg whites. Whisk frequently.
- At first the eggs and sugar will be dense and hard to whisk. Then, the sugar will dissolve and the mixture will be thin and easy to whisk. Finally, the eggs will begin to froth. At this point we need to watch our temperature very closely, whisking continuously.
- When you reach 160° F (71° C), continue cooking and whisking the eggs for 15 seconds. This will ensure we kill bacteria that can cause foodborne illness.
- Using a stand mixer or hand mixer with a whisk attachment, whip the warm egg whites on high speed for about 5 minutes. Halfway through the mixing, add cream of tartar for extra stability and a half a vanilla bean for extra flavor.1 tsp vanilla extract, ¾ tsp cream of tartar
- Whip until you have firm to stiff peaks (5 minutes is just an estimate).
Cover the Ice Cream Cake with Swiss Meringue
- Assemble the Bombe Alaska on a heat-safe baking tray. To do this:Turn the frozen cake upside down on a heat-safe baking tray. Remove the bowl. It’s likely that the bowl will not immediately come off. If this happens, take a kitchen blow torch to the sides until it loosens. Or, set the bowl in some warm water until the bowl can be removed.
- Remove the plastic wrap from the frozen cake.
- Quickly cover the entire cake with the Swiss Meringue. Use a frosting spatula or similar to cover the entire cake with meringue that is about 1” (2.5 cm) thick.
- If you want to pipe on a decoration for your Bombe Alaska, transfer some of the Swiss Meringue to a pastry bag fitted with a decorative tip. In this case, you can spread the initial layer of Swiss Meringue on a bit thinner and pipe on some decoration to thicken the layer of Meringue. The important thing is that the cake is covered with about 1" of insulation (meringue).
Bake the Bombe Alaska
- Bake at 465° F (240° C) for 5 minutes. At this point, the top of the cake will look toasted on the outside and you can add some color to the bottom with the blow torch.
Flambé the Bombe Alaska!
- Spray (or sprinkle) a small amount of rum on the outside of the cake. Add a small amount of liquor to a heat safe glass Pyrex measuring cup as well. Finally—using a long utility lighter—you can set the rum in the pyrex on fire and poured that rum on fire over our Baked Alaska!rum
- All this heat will probably not be enough to warm the ice cream cake enough to cut. Let it set out to warm until you can cut it with a knife. Pretty cool, huh?
“Wow che squisitezza….mi sono inscritta xke mi sono anche innamorata di questa voce calda dolce rilassante intonata…puoi fare lettore di audiolibri…mi piace sentendo l’italiano così…una bellissima musica per le mie orecchie 🙂”
“Una meraviglia !”
“Spettacolare!!!”
“Beautifully done 🙂 really love your videos… keep sharing please!! I’m subscribed to your channel 🙏”
“giusto per la scienzaaaa : la meringa è un ottimo isolante perché è piena di aria , che a sua volta trasmette molto lentamente il calore perché essendo le particelle tra loro molto distanti e sapendo che la propagazione del calore è un trasferimento in realtà di moto , urteranno tra loro con difficoltà. fun fact : il materiale più isolante al mondo , giusto per avvalorare ciò che ho scritto , è un gel solido composto dal 99.9% di aria. Io sarò stato noioso, ma quanto è bella la scienza ?? bellissima torta ;)”
You’re amazing, thank you!